
How to Digitally Sign Excel Macro Project?

What is Digital Signing?
A digital signature is a secure, electronic equivalent to a handwritten signature or stamped seal. It comprises an electronic mechanism by which cryptography establishes the authentication of digital documents.
Because of this, Excel macros with a digital signature ensure that the macro is unchanged by anyone after it has been signed.
Recommended: What is Digital Signature? Types of Digital Signatures
In the world of digital signatures, code signing certificates are fundamental; they contain both the public key (for validation) and the private key (for signing). The issuer is one of the trusted CAs, such as DigiCert, Sectigo, or Comodo.
Why Should You Digitally Sign Excel Macros?
Creating an environment wherein the process is secured and authentic is where a digital signature in Excel macros plays a key role, as it will prevent any outside modifications by users, thus safeguarding credibility.
VBA (Visual Basic for Applications) in Excel macros is a powerful function that automates procedures that provide room for risk in case of misuse.
Recommended: How Do I Sign a VBA Macro in MS Office with a Timestamp?
If you digitally sign your Excel macros, a warning is given to those accessing the macro to likely harm or remedy harm done; the degree to which this occurs varies. Check out the reasons why you should digitally sign your Excel macros below:
Security Against Malware
Attackers can exploit the macro function to spread viruses or malicious code. Digital signatures for a macro provide some protection against such risks, as they make it clear to the recipient that the macro file has originated from a secure and trusted source.
Because it is signed digitally, the user has the option to check its integrity and authenticity before granting it access.
After the macro has been signed, any alteration is deemed illegitimate. This is because it would have been done without authorization from the users; thus, this delivery of protection ensures a minimum risk of spreading infections by Excel files.
Authenticity and Trust
A digital signature acts as a certificate of authenticity to prove that the macro was created and signed by an author of recognized identity. This assurance builds trust among the users, particularly in environments where secure arrangements are critical.
Recommended: What is File Integrity? Difference Between File Integrity and Authenticity
With their user-friendly indication of the macro’s legitimate origin, digital signatures allow all users to determine whether to trust and enable the macro.
This is of particular importance to developers and to organizations relying on macros to automate their workflows.
Compliance with Organizational Policies
Most organizations enforce strict security policies that allow the execution of only those macros that are signed by a trusted publisher. To comply with such policies and allow easy deployment in secure environments, macros can be digitally signed.
This is particularly important in regulated industries where adherence to IT and regulatory standards is mandatory. In signing your macros, you show your commitment to providing a secure and compliant working environment.
Protection of Intellectual Property
A digital signature protects your intellectual property by preventing unauthorized modifications to your macro. Should anyone attempt to change the signed macro, the digital signature becomes immediately invalid, informing the users of such a change.
This thus ensures that the original code would remain uncorrupted and free from misuse. In turn, for developers, this protection is really handy as it helps protect the integrity and reputation of their work.
Avoidance of Security Warnings
Unsigned macros give security warnings like “Macros have been disabled” or will display “This file contains potentially unsafe content.”
Users experience confusion along with distrust following receipt of these security alerts. Exercising digital signature capability avoids security warnings that trusted users encounter, resulting in a better user experience.
Digitally signed macros build user confidence in safety, which lowers resistance to enable functionality, simultaneously boosting workplace productivity.
Support for Enterprise Environments
Signed macros function as essential security tools while also maintaining enterprise operational efficiency.
Organizations that depend on information technology deploy their automation solutions securely using digitally signed macros for enterprise-level distribution.
Deployment techniques become more efficient, and suspicious or unauthorized scripts trigger fewer disruptions when macros are signed for authentication purposes.
The deployment of automation tools becomes possible without hurting an enterprise environment’s security protocols.
Legal Validity
The digital signature ensures the legal power of your macro because it verifies your authorship.
Your signature acts as proof of authorship for your macros and defends against tampering, enabling users to authenticate both your identity and defend changes to macro content during disputes.
The non-repudiation feature makes automation solutions more valuable for developers and organizations by verifying both authorship and mutual trust.
Preparing Your Environment for Digital Signing
Before you start digitally signing your Excel macro project, some prior steps must be undertaken. This includes acquiring a code signing certificate, a secure hardware token setup, and the installation of software tools necessary for it.
Step 1: Purchase a Code Signing Certificate
A code signing certificate will be required for signing a digital signature to an Excel macro. A code signing certificate establishes you as the publisher or organization that certifies the code and forms a trust anchor for your digital signature.
This can be obtained through a CA trusted. The CA will perform identity verification and then provide the certificate based on the private key used to sign the macro or the public key used for signature verification.
Step 2: Set Up a Secure Hardware Token
Private keys specifically employed for code signing activities must be secured on specialized hardware (USB token or hardware security module) after 2023. Secure hardware storage for private keys protects the key against unauthorized cybercrime access.
Recommended: Simplifying Code Signing Certificate Delivery Methods (Private Key Storage Options)
After acquiring a code signing certificate, the Certification Authority typically provides you with a secure USB token for keeping your private key safe.
Step 3: Install Necessary Software
The signature creation process requires you to install particular software tools on your system. These include:
- Microsoft SignTool: The Windows Software Development Kit (SDK) contains a SignTool executable that executes file signing operations through command-line interfaces.
- Subject Interface Package (SIP): With this package, users can digitally sign their VBA projects in Excel.
- Microsoft Visual C++ Redistributable 2010: SignTool functions properly when the Microsoft Visual C++ Redistributable 2010 library gets installed by users.
Method 1: Digitally Sign Excel Macros Using SignTool and CMD
Step 1: Insert Your Secure Hardware Token
Before proceeding, ensure that your secure hardware token is plugged in. This allows the signing tool to recognize the private key residing on the token.
Step 2: Open Command Prompt as Administrator
To bring up the Command Prompt with administrative privileges:
- Type “cmd” into the Windows search box.
- Right-click on Command Prompt and select Run as Administrator.
Step 3: Navigate to the SignTool Directory
Copy the command given below and paste it. Get the Windows software development kit version number specifically installed on your device.
cd C:\Program Files (x86)\Windows Kits\10\bin\YourSDKVersion\x86Tip: The .dll files we’ve downloaded are 32-bit files. Hence, we’ve used the 32-bit version (x86) of SDK/SignTool, and you need to do the same.

If you’ve installed SDK into some other directory, use cd C:\ and append the correct file path.
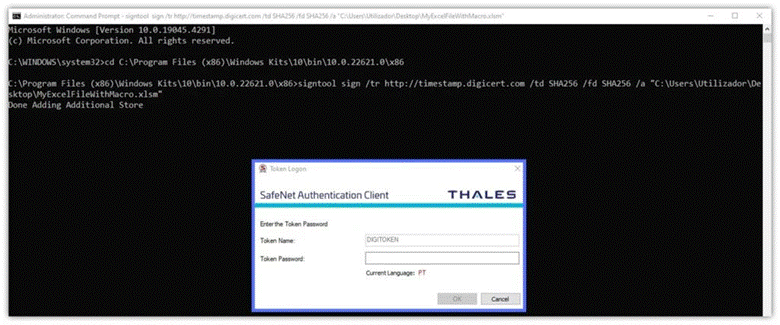
Step 4: Sign and Timestamp Your Macro Using SignTool
Open the SignTool signing command below and copy it. Edit the parts in bold to contain your timestamp server authority (TSA) info along with the file that contains your macro.
signtool sign /tr http://CAtimestamp.server.com /td SHA256 /fd SHA256 /a "C:\filepath\MyExcelFileWithMacro.xlsm"This is how it looks for us:

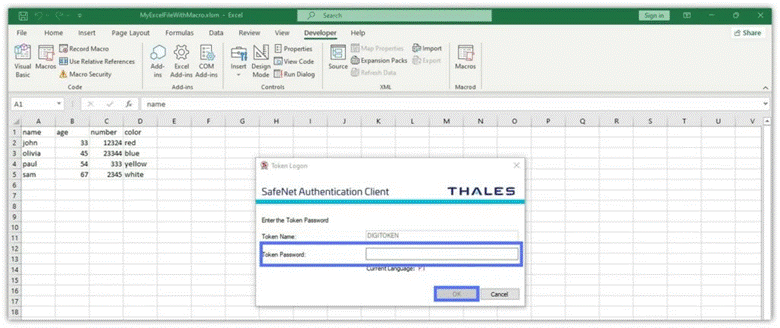
Enter the token password when prompted:
Now, Your macro is signed and timestamped.

Method 2: Digitally Sign Excel Macros Directly in Excel
Step 1: Open Your Excel File
Open the Excel file containing the macro you are about to sign.
Step 2: Insert Your Secure Hardware Token
Now insert the USB token into the device.
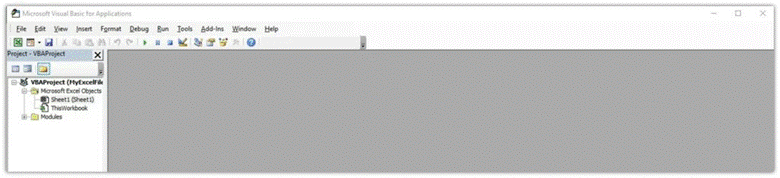
Step 3: Open the Visual Basic Editor
Then click on the Developer tab. In the Code section, click on the Visual Basic icon, and it should open the Visual Basic (VB) editor.
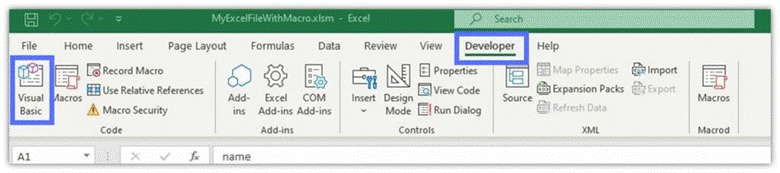
Now, if you cannot find the Developer tab, then in that case go to File > Options > Customize Ribbon > Developer > OK.
Step 4: Start the Digital Signature Process
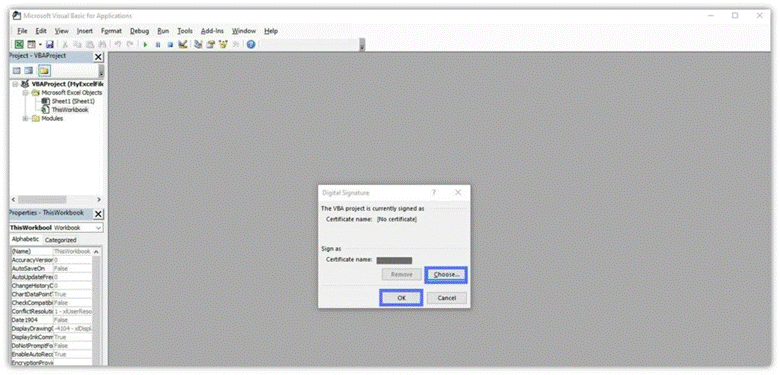
In the VB editor, select Tools, then Digital Signature. A new window will pop up.

Step 5: Choose Your Code Signing Certificate
In the editor, click Choose.
A new box will now pop up showing you the digital certificate that corresponds with the private key saved on the USB token. Here, you will choose the relevant certificate and click OK.
Step 6: Apply the Signature and Save Your File
The pop-up box will now show the code-signing certificate name, as below:
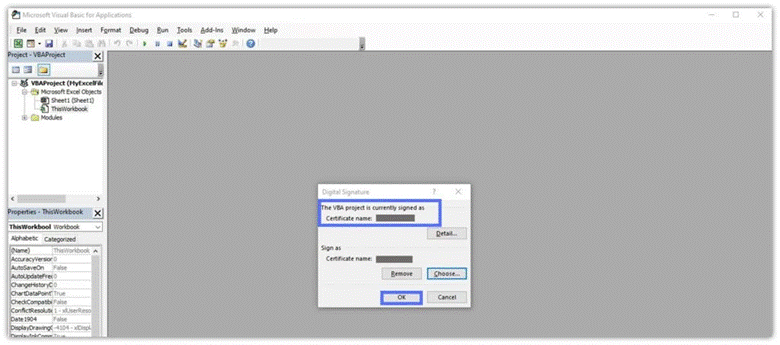
If you have chosen the right certificate, then just click OK again. Close the Visual Basic editor, and save the Excel file. When prompted, enter the password for your code-signing certificate.
This is what you should see:
Congratulations! You’ve just signed your first Excel macro. You won’t be seeing an official message confirming the signature, so don’t worry.
Before we start, let’s ensure the signature will still be valid after the code-signing certificate expires. Now, to do that, we will timestamp our excel macro digital signature.
Step 7: Timestamp Your Excel Macro Digital Signature
Run Command Prompt as an administrator, then navigate back to the SignTool folder and type the following command:
signtool timestamp /tr https://yourCAtimestamp.com /td SHA256 “PathtoYourExcelFileWithMacro.xlsm“Verifying the Digital Signature on Your Excel Macro
After digitally signing your Excel macro, ensure that the signature has been applied properly.
To verify the signature, you can use SignTool as follows:
- Open Command Prompt as Administrator.
- Navigate to the SignTool directory.
- Use the following command to verify the signature: signtool verify /pa “C:\path\to\YourExcelFile.xlsm”
Conclusion
Protect your code with confidence! Sign your Excel macros securely and effortlessly with SignMyCode, your trusted solution for digital signing. Get started now!

Cheap Code Signing Certificates
Prevent Code Tampering and Authenticate Code Integrity by Digitally Sign your Code with Trusted Code Signing Certificates.
Starting at Just $215.99/Year
