
How to Use Windows Defender to Scan for Malware?
Explore the blog to learn how to use Windows Defender to Scan the Malware!
How to Use Windows Defender to Scan a Folder for Malware?
To use Windows Defender to scan a folder for malware, you can follow these detailed steps:
Method 1: Right-click Scan
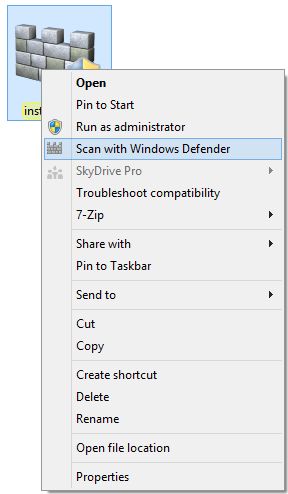
The folder you want to scan with, for instance, “Scan“.
Accordingly, from the context menu, you will be able to choose “Scan with Windows Defender “.
Windows Defender scans the folder and its subfolders to detect possible viruses across the whole system.
Method 2: Custom Scan
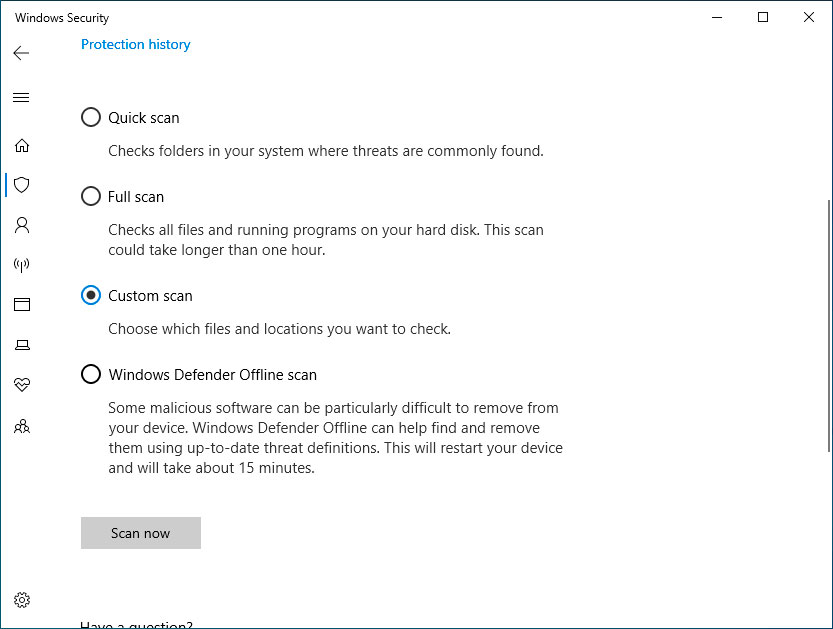
Clicking on the Start button and then on Settings > Privacy & Security > Windows Security will give you access to this program.
In Virus & threat protection > Scan options, click on Run a new scan option.
Choose the option Scan a Custom folder and select the desired folder.
Now click on Scan Now for an immediate scan.
Method 3: Microsoft Defender Offline Scan
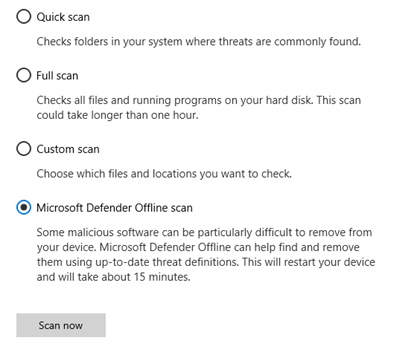
Windows Security can be opened by clicking the Start button and it is under this menu item settings – Privacy & Security – Windows Security.
Tap on Virus & Threat Protection, located on the menu, and then select Scan options.
Microsoft Defender Antivirus Option, Offline Scan, will start the scanning process.
This scan is not bound to the operating system itself; therefore, it is more powerful in tracking malware that can be hidden even in deep layers.
Method 4: Using Command Prompt
You need to open Command Prompts as an administrator by clicking on the button “Start”, entering “cmd” into the search field search box, right-clicking on Command Prompts and choosing the “Run as administrator” option from the context menu.
Use the command mpcmdrun -Scan -ScanType 3 -File “C:Specify a value for \PATH\TO\FOLDER” as a parameter to scan a particular folder.
Replace “C:Scan a folder using the command “C:/path/to/folder” where you change C: with the actual path to the folder you want to scan.
Method 5: Starting a Scan
Scan for Viruses With Windows Defender. For this, we Run A Virus Scan,
Start Windows Security using the Start button, and afterward, click Settings, Privacy & Security, and then Windows Security.
Click on “Select Device” > Move to “Start Scan.”
Fasten your seat belts and press the Scan Type Button – it is up to you if you choose Quick Scan or Full Scan, and it’s scan time to see the evidence of malware.
Through such ways, you will be able to correctly apply Windows Defender scan to a folder for malware, and eventually, it will maintain the security system.
It is suggested that you constantly monitor your programs for malware and keep Windows Defender up to date, so always be aware of the latest virus list that can help you achieve the best protection.
Recommended: How to Identify Your Windows Defender Version?
How to Perform Microsoft Defender Offline Scan Function?
Microsoft Defender Offline Scan is an effective weapon for discovering and eradicating malware that has been embedded into your system away from a keen eye.
To run an offline scan, follow these steps:
- Access Virus & Threat Protection: Open Windows Security (Windows Defender) and use the “Virus & Threat Protection” Branch.
- Select Scan Options: You may go to “Current Threats‘ ‘ or “Threat History‘ ‘ and select the scan options; it is “Scan options” or “Advanced scan,” depending on your Windows version.
- Initiate Microsoft Defender Offline Scan: Launch “Microsoft Offline Defender scan” by clicking “Scan now“. Your PC will spell out that there will be a restart, and then the offline scan will run in the recovered environment.
- Check Scan Results: With the scan submitted, the PC will restart under automatic mode. To return to the displayed outcomes, enter the “Virus & Threat Protection” section again, and then find “Protection history” or “Threat history” on it.
In case you use your Windows 7 or Windows 8.1 version, download and install Windows Defender Offline on a disc, DVD, or USB flash drive, and create media, then start your PC with the created media.
Recommended: What Is the Windows Defender Security Warning?
To solve the problem, just confirm you are running with administrative rights; after that, try to disable startup programs or run a clean boot before the offline scan.
If you have done all the above and the issue continues, you probably need to start from scratch. It means you should reset your system, reinstall, or perform an in-place upgrade of your Windows 10 operating system.
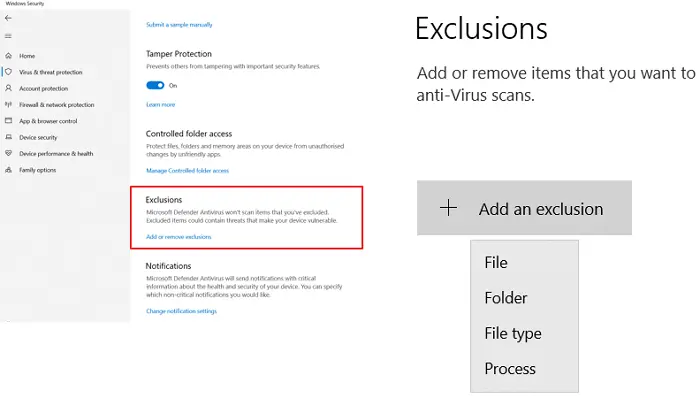
Setting Up Exclusions in Windows Defender
To run an offline scan, follow these steps:
- Access Windows Security: Click “win+r” and type “ms-settings:windowsdefender” to get into Windows Security.
- Manage Settings: In the window called “Security,” click “Virus & threat protection” and then “Manage settings” under “Virus & threat protection settings.”
- Add or Remove Exclusions: Click on “Add or remove exclusions” under “Exclusions” in the list.
- Choose Exclusion Type: Click on the “Add an exclusion” button and select the kind of exclusion you need: file, folder, file type, or process.
- Select File, Folder, File Type, or Process: The type of exclusion that you want to create will determine browsing and selecting the file type, folder, or process that you wish to exclude from the scanning.
- Confirm Exclusion: Then, after you tap the item, choose “Select folder“, “Add“, or “Add an exclusion” to show that you want to add the exclusion.
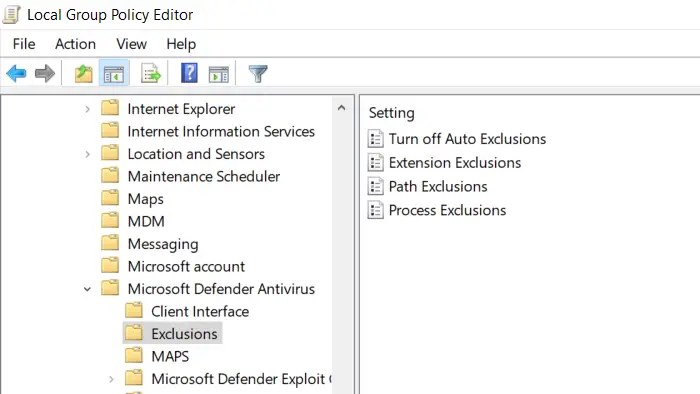
For advanced exclusion settings, you can use Group Policy Editor:
- Access Group Policy Editor: Press” Win +R” and type” gpedit.msc” to run Group Policy Editor.
- Configure Exclusions: Manage to “Computer configuration” > “Administrative templates” > “Windows components” > “Microsoft Defender Antivirus” > “Exclusions“
- Set Extension, Path, or Process Exclusions: Set exclusions for extension path or process forms based on the requirement. Click “Apply” and “OK” to save the changes.
When considering adding exclusions, keep in mind that the higher the level of exclusions, the higher the risk of malware infections as well, so only add exclusions for the files, folders, file types, or processes you are sure are safe.
Utilizing Group Policy Editor for Defender
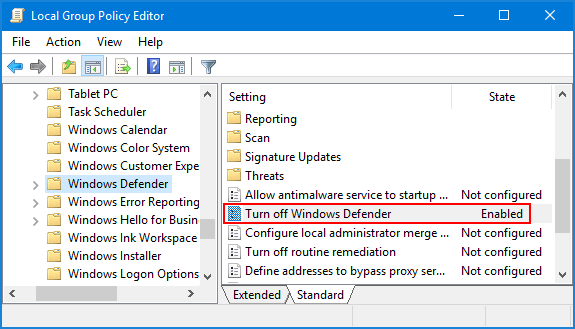
To utilize Group Policy Editor for Windows Defender, follow these steps:
- Access Group Policy Editor: Type “gpedit.msc” in the run dialogue box, usually by pressing the Windows logo key and the letter “R” together, and then press Enter to launch the Group Policy Editor.
- Navigate to Windows Defender Settings: In the Edit Group Policy, locate “Computer Configuration” > “Administrative Templates” > “Windows Components” > “Microsoft Defender Antivirus“.
- Configure Defender Settings: Otherwise look for special settings such as “Turn Off Windows Defender Security” or “Turn Off Active Protection” in the right pane. That will bring up a timeline, click on the item you would like to change.
- Enable or Disable Settings: For settings adjustment, just select “Enabled” or “Disabled” based on what you would want then click “Apply” and then “OK” in order to save your changes.
- Update Group Policy: To use embedded settings, update the Group Policy settings in the local space by entering in the console the code “gpupdate /force“.
Optimizing Microsoft Defender Service
To optimize Microsoft Defender Service, you can consider the following steps:
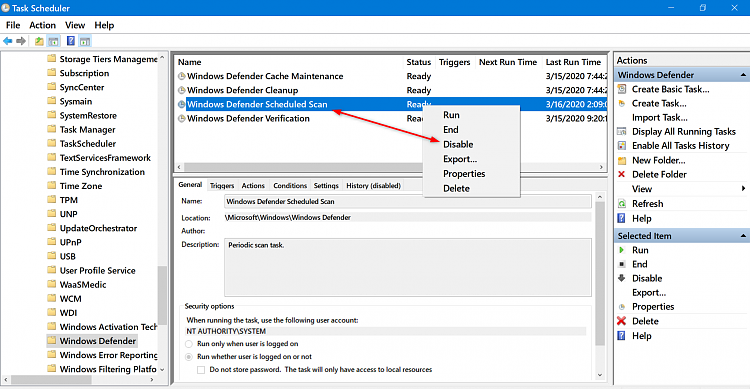
Disable Windows Defender Tasks:
Disable unnecessary Windows Defender tasks in the Task Scheduler to reduce high memory usage.
Navigate to Task Scheduler Library > Microsoft > Windows > Windows Defender and disable all tasks, including Windows Defender Cache Maintenance, Windows Defender Cleanup, Windows Defender Scheduled Scan, and Windows Defender Verification.
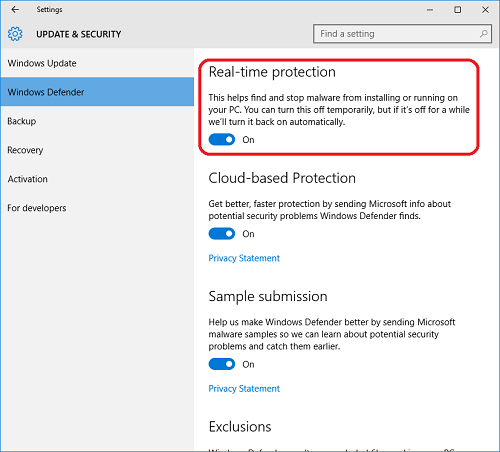
Disable Real-time Protection:
Temporarily disable Real-time protection in Windows Security to reduce high CPU usage. Navigate to Windows Security > Virus & threat protection > Manage settings > Real-time protection and turn it off.
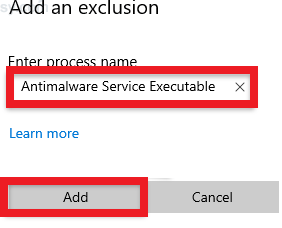
Add Antimalware Scan Service Executable as an Exclusion:
Add the Antimalware Scan Service Executable as an exclusion to avoid resource waste.
Right-click on the taskbar, choose Task Manager, find Antimalware Scan Service in the Processes tab, right-click on it, choose Open File Location, copy the full path of it, go to Settings > Update & Security > Windows Security > Virus & Threat Protection> Manage settings > Add or remove exclusions > Add an exclusion > File, paste the path, and click Open.
Use Group Policy Editor to Manage Defender Settings:
Use Group Policy Editor to manage and customize Windows Defender settings. Navigate to Computer Configuration > Administrative Templates > Windows Components > Microsoft Defender Antivirus and configure settings like turning off Windows Defender Antivirus or real-time protection.
Use PowerShell to Manage Defender:
Use PowerShell to manage and disable Microsoft Defender. Open PowerShell with administrator privileges and run commands like “Set-MpPreference -PUAProtection 1” to enable PUP/PUA protection or “Set-MpPreference -DisableRealtimeMonitoring $true” to disable real-time monitoring.
Use Microsoft Defender Offline:
Use Microsoft Defender Offline for offline scanning and malware removal. Run Microsoft Defender Offline if Windows Security detects rootkits or other highly persistent malware or if you suspect your PC might have malware hiding on it.
Conclusion
The digital age is more and more saturated, which makes cybersecurity more relevant than ever.
Microsoft Authenticode Signing
Verify the Integrity of your Software by Adding Authenticode Signature on 32/64 bit Software Binaries using Code Signing Certificate.
Buy Authenticode Code Signing Certificates
