
How to Sign an Unsigned Driver With Microsoft SignTool?

Installing SignTool.exe on the Windows device
To perform the installation of Windows 10 SDK, you can take advantage of Visual Studio 2015 Update 1, which already features SDK components that are, by default, not installed but included. Here’s how to proceed:
- Access Control Panel: The instructions for Windows will face the Control Panel and find the “Programs and Features” there.
- Select Visual Studio 2015: In the “Trusted Installer” folder, open install programs, locate Microsoft Visual Studio 2015, and select “Change“.
- Modify Installation: Hence, this step will begin the Visual Studio 2015 setup procedure. When you are looking for the “Modify” option, it is the one that allows you to change the components that have been present.
- Find Universal Windows App Development Tools: Within the Visual Studio component list, locate “Universal Windows App Development Tools”. Choose it and roll down the list to demonstrate the “Universal Windows App Development Tools” sub-items.
- Select Windows 10 SDK: Along with sub-items, there is the “VC++ Transformation Package (vcpkg).“ Mark it to include it in the VS installation.
After you have finished this operation, Visual Studio will continue to install the Windows 10 SDK components together with its other features.
However, if you prefer to install the Windows 10 SDK directly from Microsoft’s website, you can do so by visiting the provided link: https://go.microsoft.com/fwlink/?LinkID=698771
Upon installation of Windows 10 SDK, you may find a program under the name SignTool.exe utility in the following directories:exe utility in the following directories:
For 32-bit systems: c:\Program Files (x86)\Windows Kits\10\bin\x86
For 64-bit systems: c:\Program Files (x86)\Windows Kits\10\bin\x64
Having SignTool. the ease of use coupled with software that allows you to sign your drivers and software of choice as possible, making authentication and control of integrity ensured.
Purchase a Code Signing Certificate issued by a Publicly Trusted Certificate Authority (CA)
The procedure of acquiring a code signing certificate is simple and can be done efficiently online at SignMyCode.com.
Step 1: Select a Product & Complete Purchase Procedure
Choose Product First, click the “Code Signing Certificate” product to be chosen. Please select the validity period for the certificate that you wish to issue (1, 2, or 3 years) and complete the order procedure.
Step 2: Validation Process
Upon request submission, it undergoes the validation process preceded by the respected certificate authority. This is reflectively completed within approximately 1 – 5 days based on product you choose.
Step 3: Certificate Installation
The Certificate Issuance process will start after the validation process is successfully completed by CA, the Certificate installation instructions will be sent via email to the Certificate Requester.
Set up the Hardware Security Token sent to you by the CA
All the steps that would be necessary to configure the hardware security token of the CA are carried out carefully so as to ensure the proper functioning and security.
Unbox the Hardware Token:
Unpack the hardware security token sent to you by the CA carefully, checking all the components are there and undamaged. Typically, the package consists of the hardware token device, a USB cable for connection, as well as the accompanying documentation, if any.
Connect the Hardware Token:
Look for the USB port on the device of the hardware token and the USB port on your computer machine. Plug one end of the USB cable into the hardware token device and the other end into a USB port on your computer that is not being used. Verify that the connection is safe.
Authenticate and Initialize the Token:
Once you have the hardware token connected, follow the instructions given by the Certification Authority or the token manufacturer to make your device authentic and initialized. Usually, this functionality is enabled by entering a PIN or passphrase that will unlock the device and let it be used.
Recommended:
How to Initiate and Reset Safenet eToken?
How to Set Up Your DigiCert-Provided eToken?
How to Initialize your Yubico Token?
Generate or Import Keys (if applicable):
If the hardware token is used for cryptographic operations like key generation or storage, you may have to generate new keys or import existing ones to the device. From the CA instructions or the token documentation, look for guidelines concerning key management.
Recommended:
How to Create CSR, and Import Code Signing Certificate in Azure KeyVault HSM?
How to Generate CSR and Key Attestation Using Luna Network HSM?
Test the Token:
In the end, the hardware token should be plugged and tested to make sure it works. This may include the test execution of a sample cryptographic operation or the checking of the token’s status using the software provided by the CA or the token manufacturer.
Safely Store and Protect the Token:
Once the hardware security token is set up and tested, it should be kept in a secure location away from access to malevolent individuals. Handle the token as you would any other important confidential crypto data, as it plays the key role in maintaining the safety of your digital assets.
Download and Install the Authentication Client provided by the CA
Generating the hardware security token given by the Certificate Authority (CA) involves accessing and installing the authentication client software provided by the CA, which can be downloaded through the download link or portal provided by the CA.
Recommended: Install SafeNet Client Software, Initiate & Reset eToken
To start, you have to download the program provided by the CA and install it on your computer. After landing on the download page, look for a version of the software that is compatible with your operating system and hardware and then click on it.
After downloading the installation package, store it to a place where you can easily access it and check its integrity to make sure that it has not been tampered with.
Then, run the installation wizard by double-clicking on the authentication client software and following the instructions on the pop-up window to complete the installation.
If an agreement or terms of service is required during the installation process, you may have to accept them. To start using the authentication client, you need to install the software and configure it according to the instructions provided by the CA.
This may include setting up user credentials, PINs, or other security settings. The last step in authenticating the client is to check if it works correctly with the hardware security token and allows it to perform cryptographic functions.
Given the steps above, the process of setting up a hardware security token is getting to be a smooth one.
Get Administrator Permissions
The SignTool digitally signs files using the signature utility that works with administrative account rights. Without such permissions, users might encounter restrictions or errors when trying to use SignTool on their gadgets to sign files.
If you realize that you do not have administrative access to your device, you must contact your IT department or system administrator for help.
Many enterprises and systems limit administrative access to authorized personnel so as to ensure security and prevent unneeded modifications to software and configurations installed on the devices.
The administrators may use their control to install and configure personal software apps in addition to granting access to the SignTool tool.
How to Sign an Unsigned Driver With Microsoft’s SignTool?
Step 1: Running the Command Prompt as an Administrator
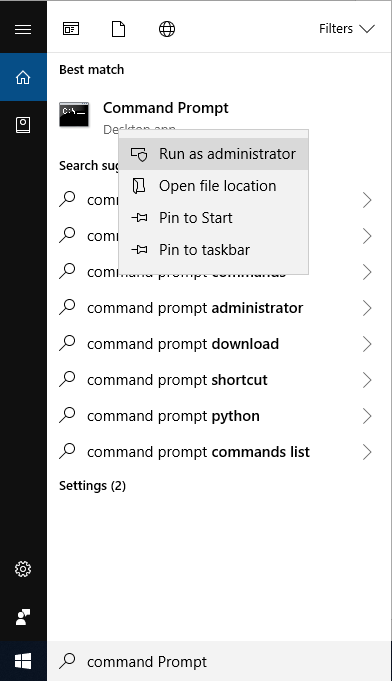
- One of the most convenient ways to launch the cmd console is to sign in as an administrator on your device. So, all you need to do is go to the windows start menu directly and then type “Command Prompt” in the search field.
- Double-click on the “Command Prompt” app whenever you look at it in the search results.
- Select “Run as administrator” from the context menu. This will start a computer program with administrator access.
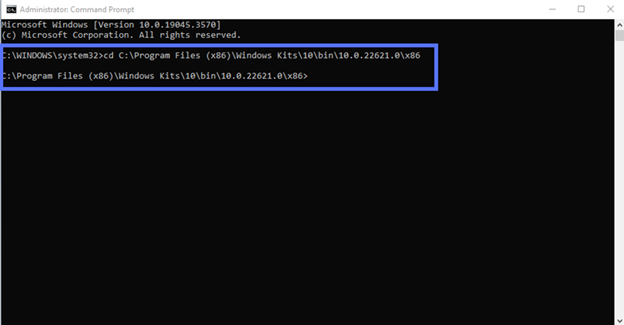
Step 2: Go to the SignTool Directory
- Now that the Command Prompt window is open, you will need to find the directory that contains the SignTool utility.
- By default, SignTool is supplied with the Windows Software DevelopmentKit(SDK), which is usually installed in the “Program Files (x86)” directory.
- Toggle the directory by typing in the “cd” command. For example:
cd "C:"C:\Program Files (x86)\Windows Kits\10\bin\YourSDKversion\x86"- Where “YourSDKversion” is the installed SDK on your machine, input the version number.
Step 3: Sign the Windows Driver
- After you are in the directory containing the SignTool utility, you can now use it to sign the Windows driver.
- Use the following command to sign your driver with a timestamp:
signtool sign /tr http://CAtimestamp. server. com /td SHA256 /fd SHA256 /a "C:preserve the environment by providing coverage \filepath\Mydriver.dll.- Replace “http://CAtimestamp.server.com” with the URL of your CA’s timestamp server and “C:\myfile. The second approach is to use the “Driver Letter dll” with your driver’s file path.
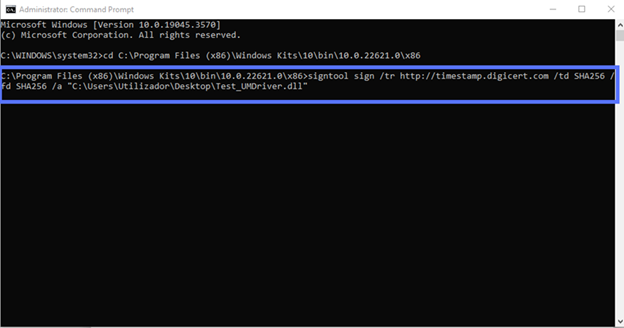
- Next, enter your password and press Enter. A prompt asking you to enter the authentication client password operation may appear.
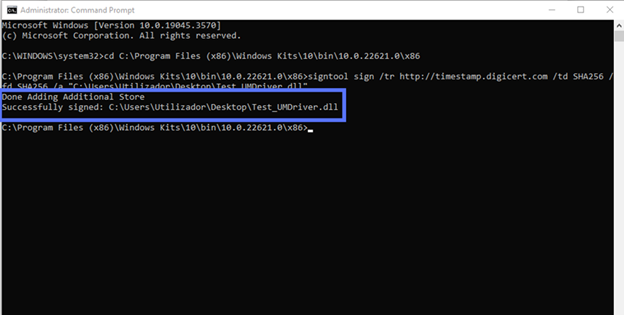
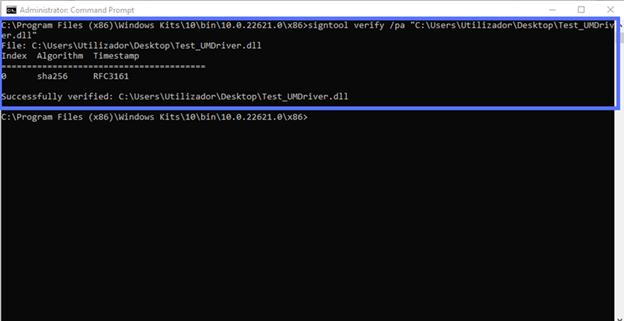
Step 4: Verify the Signature
- After signing all the fields, the next step is going to be signature verification, which is used to make sure everything works properly.
- Use the following command to verify the signature:
signtool verify /pa /v "C:Application:\filepath\Mydriver.dll"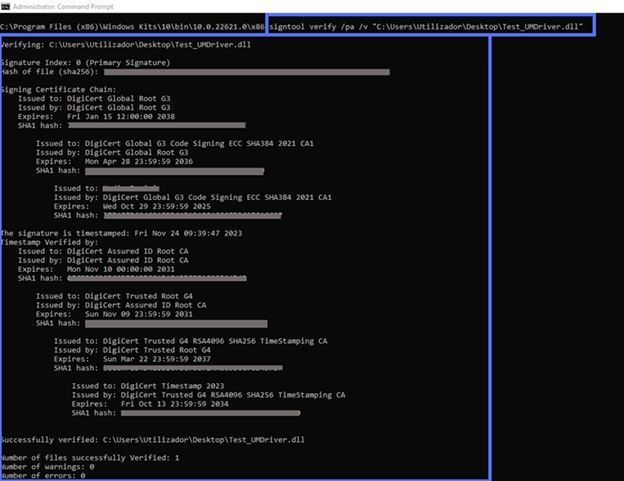
Conclusion
SignMyCode offers a wide range of Code Signing Certificates starts at just $215.99 and strong support to help you overcome the difficulties in digital signing; the software will comply with the standards of the industry and will be trusted by others around the world.

Cheap Code Signing Certificates
Prevent Code Tampering and Authenticate Code Integrity by Digitally Sign your Code with Trusted Code Signing Certificates.
Starting at Just $215.99/Year
