
How to Use Microsoft SignTool with AWS CloudHSM to Digitally Sign Authenticode Files?

AWS CloudHSM is a secure, trending, and reliable technology for storing private-public key pairs. It’s an AWS cloud-based HSM that streamlines the HSM operations, enables remote access to private keys, and maintains integrity.
Reputed Certificate Authority DigiCert’s EV Code Signing Certificate supports AWS CloudHSM & Cloud Key Management Service.
Further, it can be used with your favorite code file signing tools, like Microsoft SignTool. The same is demonstrated here. By undergoing this article, you can learn to use Microsoft SignTool with AWS CloudHSM.
What is AWS CloudHSM?
AWS CloudHSM refers to a hardware security module that is provided through cloud-based technology. This HSM provides all the functionalities similar to a physical HSM, but Amazon Web Services manages its compliance and security.
Recommended: What is AWS CloudHSM? Everything to Know About
You can import, export, and store the “n” type of encryption, decryption, and cryptographic keys in the AWS CloudHSM. The best part is that it complies with the FIPS 140-2 Level 3 standards.
Procedure To Use Microsoft SignTool with AWS CloudHSM
The process to use Microsoft SignTool with AWS CloudHSM consists of three parts as follows:
Part 1: Fulfilling the prerequisites and configuring the systems
Part 2: Generating the code signing certificate
Part 3: Signing the executable file using the Microsoft SignTool
Let’s go over every part to understand the detailed steps to follow to complete the code signing.
Part 1: Fulfilling the Prerequisites and Configuring the Systems
You need to execute the following steps for appropriate configuration.
Step 1: To utilize the SignTool with AWS CloudHSM, you need to create an Amazon Web Services account and configure the following services.
- A Virtual Private Cloud (VPC).
- An EC2 client instance based on Windows OS in the same VPC.
- An AWS CloudHSM cluster in the same VPC. The cluster must contain a minimum of one HSM.
- A crypto user or CU is needed to handle and manage the keys stored in the CloudHSM cluster.
- An unsigned software or an executable file.
- The Microsoft SDK (Software Development Kit).
In addition, you will require a CA (Certificate Authority), such as DigiCert or GlobalSign.
Step 2: Once the EC2 client instance and CloudHSM cluster are created, configure the CA. You can either host your preferred CA on a Windows Server or use a publicly trusted CA.
Step 3: Install the Microsoft Windows software development kit. You can use any of the three SDKs: SDK 10, SDK 8.1, and SDK 7.
The SignTool is a part of the SDK, which makes it compulsory to download and install it. Further, the SignTool will be located at:
“C:\Program Files (x86)\Windows Kits\<SDK version>\bin\<version number>\<CPU architecture>\signtool.exe”
Part 2: Generating the Code Signing Certificate
Following the creation of the EC2 instance and installation of Windows SDK, you need to generate a CSR and avail of the code signing certificate.
In this tutorial, we are using “certreq” an executable included in the Windows SDK for generating the code signing request.
Step 1: Connect your system to the EC2 Windows instance that you created in part 1.
Step 2: Create a new file with name and extension as “request.inf”.
Step 3: Open the “request.inf” file and add the following content to it.
[Version]
Signature= $Windows NT$
[NewRequest]
Subject = "C=<Country>,CN=<www.website.com>,O=<Organization>,OU=<Organizational-Unit>,L=<City>,S=<State>"
RequestType=PKCS10
HashAlgorithm = SHA256
KeyAlgorithm = RSA
KeyLength = 2048
ProviderName = Cavium Key Storage Provider
KeyUsage = "CERT_DIGITAL_SIGNATURE_KEY_USAGE"
MachineKeySet = True
Exportable = False
Before you proceed, ensure that you replace the “Subject” parameters with the details of your organization.
Step 4: Now, run the “certreq.exe” and save the code signing request (CSR).
The command to execute:
certreq.exe -new request.inf request.csrIn the above command, “request.csr” is the file name in which the code signing request content will be saved. Furthermore, the command will generate a key pair on the CloudHSM cluster, from which the private key will be used to generate the CSR.
Step 5: Send the generated CSR to the certificate authority or order placed enrollment form.
However, if you are utilizing a Windows Server CA, undergo the below sub-steps:
- Execute the command “certsrv.msc“. It will help you open and access the CA tool.
- On the CA’s name, use right-click “All Tasks” and then “Submit New Request“
- Go to the CSR location, select the file, and click on “Open“.
- Expand the “Server CA” menu and go to “Pending Requests”.
- Find your recently submitted request, right-click on it à All Tasks à Issue.
- Go to the “Issued Certificates” folder.
- Click on “Open” and then select “Details” tab.
- Select “Copy to File” for running the Certificate Export Wizard.
- Save the X.509 file to a secure location with the name “signedCertificate.cer“.
- Close the CA tool and execute the command: certreq.exe -accept signedCertificate.cer
Part 3: Signing the Executable File using the Microsoft SignTool
Until now, you have the AWS CloudHSM cluster, HSM, and the code signing certificate. The only thing left is to use the SignTool with CloudHSM to secure the executable file. But, before you sign the file, know about the hash algorithm used by the certificate.
To know the hash, use SignTool, and follow the below steps:
Step 1: Open the PowerShell with administrative controls and execute the below command:
Get-ChildItem -path cert:\LocalMachine\MyStep 2: Copy the thumbprint and save it.
Step 3: Using PowerShell, go to the location where SignTool is saved. If you haven’t changed the location after installation, it will be available at:
C:\Program Files (x86)\Windows Kits\10\bin\10.0.17763.0\x64
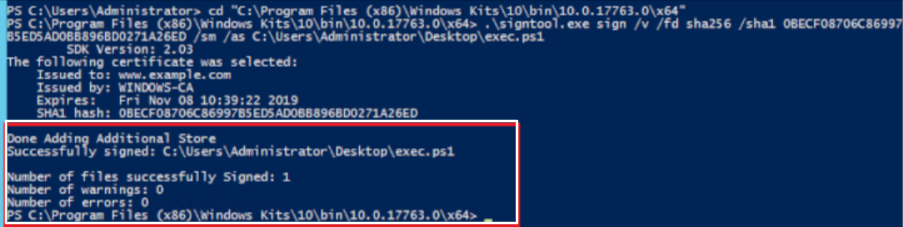
Step 4: Once you are in the SignTool directory, run the below command.
signtool.exe sign /v /fd sha256 /sha1 <thumbprint> /sm /as C:\Users\Administrator\Desktop\<test>.ps1In addition, modify the highlighted command part with your certificate’s thumbprint and executable file accordingly. As a result, your executable file will be signed using Microsoft SignTool with AWS CloudHSM.
Step 5: Lastly, verify the signing of the file by executing the following command:
signtool.exe verify /v /pa C:\Users\Administrator\Desktop\<test>.ps1Which is the AWS CloudHSM Compatible Code Signing Certificate?
To effortlessly work with AWS CloudHSM, you should consider purchasing a cloud code signing certificate. It will help you effortlessly pass the validation procedure for the AWS platform and securely store the private keys.
In addition, it’s easy to use and available in at all the validation levels. You can utilize it for signing executable files, drivers, and even hardware firmware. But whenever you buy a cloud code certificate, consider a reliable CA like DigiCert.
Concluding Up
To use Microsoft SignTool with AWS CloudHSM, you must configure an EC2 client instance and a CloudHSM cluster. After that, a code signing request has to be generated and submitted to the CA.
Once you complete the validation process, the CA will issue you a code signing certificate. You can download and use the certificate through PowerShell with administrative privileges connected to your EC2 instance to sign the executable file.

Cloud Code Signing
Seamless Automated Code Signing Tasks without Need of Physical HSM or Token using Cloud Code Signing Certificate.
Code Signing as a Service
