
Sectigo Code Signing Instructions for Google KMS: Create HSM Key, Attestation, CSR & Sign Code
Sectigo Code Signing Certificates now integrate seamlessly with Google Cloud HSM (KMS), which empowers developers with an efficient and secure way to sign their code.
It integrates a well-founded mechanism that places your private keys directly into FIPS 140-2 Level 3-compliant HSMs, ensuring high security. This will eliminate the need to wait for the physical token (USB).
Your Options for Secure Key Storage with Sectigo:
When purchasing from Sectigo, you have 3 choices for storing your private key:
1. YubiKey 5 FIPS (USB Token)
Ideal for individuals or small teams. Plug it in, sign code, done. Portable and super secure.
2. Luna Network HSM v7.X (Hardware Security Module)
Best for large organizations. Full-blown physical HSM hosted on-prem.
3. Google Cloud KMS (Cloud HSM)
Want to go cloud-native? This is where Google KMS comes in. Sectigo supports using Google KMS for certificate-based signing, making your CI/CD workflows seamless and secure.
Here, we provide a detailed guide on how to set up a Google Cloud account, generate a CSR, and sign the Code or Executables.
How to Set Up Sectigo Code Signing Certificates within Google Cloud KMS?
Follow the step-by-step instructions to issue and use a Sectigo Code Signing Certificate with the private key securely stored in Google Cloud KMS (HSM).
Follow Quick Steps:
- Setup Google Cloud Account
- Create a Key Ring, Key, and Obtain Attestation
- Create CSR
- Submit CSR
- Sign Executables
Now, we’ll see each step in detail!
Setting up a Google Cloud Account
To begin the entire setup process, you need to register an account with Google Cloud Platform, enable billing, and Create a project.
Create the Key Ring, HSM Key, and Attestation
First, you’ll need to generate a key pair in Google Cloud. Complete these steps in the Google Cloud dashboard/console:
Step 1: In Google KMS, Create a Key Ring
First, you need to create a key ring in Google Cloud Key Management Service (KMS). A key ring is a logical grouping of cryptographic keys that allows you to manage them collectively. Follow these steps to create a key ring:
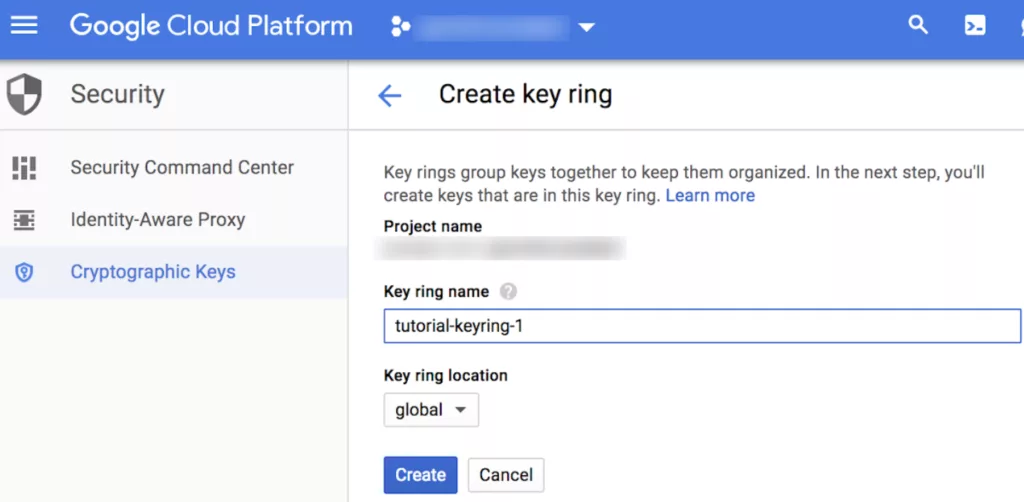
Once the key ring is created, it will serve as the container for your cryptographic keys.
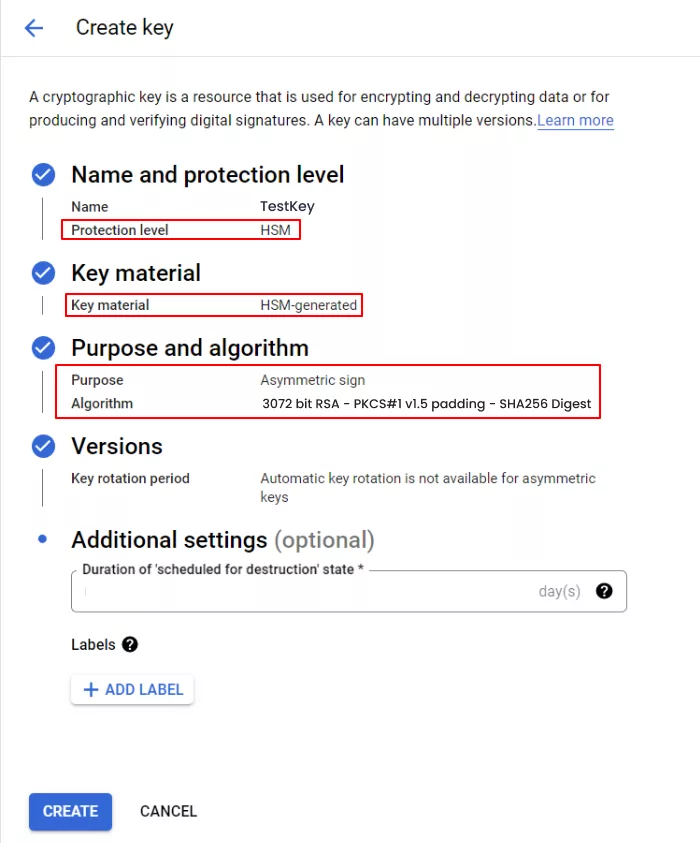
Step 2: Creating a New HSM Key
Now, after creating a key ring in the Google KMS, create a new key for you with these settings:
Before you begin, you need the following:
- A Google Cloud project resource to contain your Cloud KMS resources. We recommend using a separate project for your Cloud KMS resources that contains no other Google Cloud resources.
- The name and location of the key ring where you want to create your key. Choose a key ring in a location that is near your other resources and that supports your chosen protection level.
- Cloud KMS Admin (roles/cloudkms.admin) IAM role on the project or a parent resource to Create Key
Create a Key (Asymmetric Signing key)
- In the Google Cloud console, go to the Key Management page.
- Click the name of the key ring for which you will create a key.
- Click on Create key.
- For Key name, enter a name for your key.
- For Protection level, select ‘HSM‘.
- For Key material, select ‘HSM–Generated key’.
- For Purpose, select ‘Asymmetric Signing‘.
- For Algorithm, select 3072-bit RSA, PKCS#1 v1.5 padding – SHA256 Digest (recommended). You can change this value on future key versions.
- Click Create.
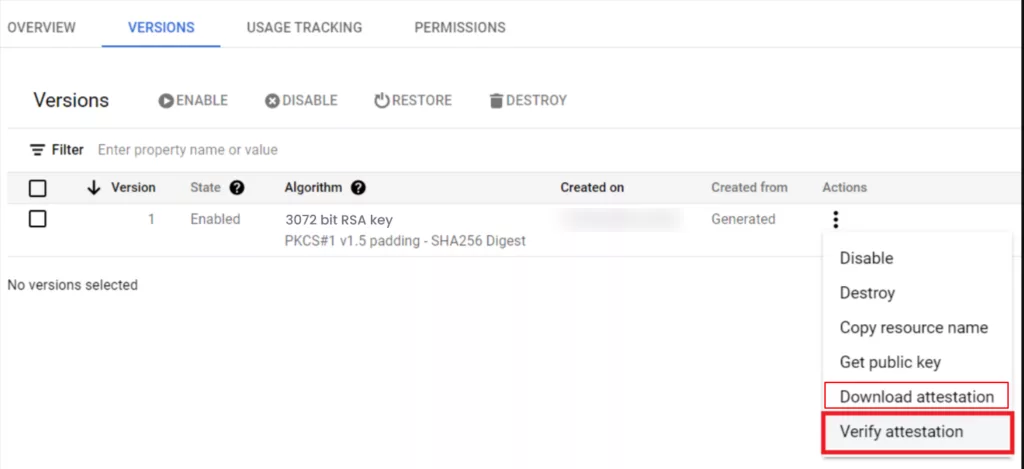
Step 3: Verify and Download the HSM Attestation
Please navigate inside your newly generated key and choose the “Versions” tab. Then, please click on “Actions” (three dots) -> “Verify attestation” -> “Download attestation bundle.” You will receive a ZIP file containing the key attestation information.
Create the CSR on Google KMS
Next, you’ll need to generate a CSR using the key you just generated. There are several different ways you can generate the CSR Using open-source utility Tool or manually using OpenSSL.
Here, we’ll be doing it with OpenSSL on Linux (Ubuntu):
This is a cloud-hosted key, not a private key just placed on the hard disk (USB), so we need to configure Google Cloud KMS PKCS#11 Library with OpenSSL to create CSR.
Prerequisites:
Install the libengine-pkcs11-openssl package using the command:
sudo apt-get update
sudo apt-get install libengine-pkcs11-openssl
PKCS #11 Library Configuration:
- Download the Google PKCS #11 library (libkmsp11.so) from the GoogleCloudPlatform/kms-integrations GitHub releases page.
- Extract the downloaded archive and store libkmsp11.so in /usr/local/lib.
- Set the PKCS11_MODULE_PATH environment variable with this command:
export PKCS11_MODULE_PATH="/path/to/libkmsp11.so"Note: (Modify the path to reflect the location where you extracted the library.)
Create a YAML Configuration File
The PKCS #11 library requires a YAML configuration file to locate Cloud KMS resources. The YAML must, at a minimum, configure a single PKCS #11 token.
Create a YAML config file (text file in /etc/pkcs11-kms.yml) and set the KMS_PKCS11_CONFIG environment variable with this command:
---
tokens:
- key_ring: "projects/{projectId}/locations/{location}/keyRings/{keyRingName}"
Where {projectId} is your Google Cloud project ID (A string, not a number; you can check it on the Billing Projects page), {location} should be the location where your keyring is hosted (e.g., europe-west6), and {keyRingName} should be the name you’ve used when creating the key ring.
All asymmetric signing and decryption keys in my-keyring will be available in the library with this configuration.
Set the Permission
You must set the permissions on the configuration file so that it is writable only by the file owner. Point KMS_PKCS11_CONFIG to your config file:
export KMS_PKCS11_CONFIG="/path/to/pkcs11-config.yaml"Google Cloud Authentication
Set up an authentication method for Google KMS using Workload Identity Federation or create a Service Account.
To create a service account, follow these steps:
- Go to Service Accounts.
- Click Create Service Account.
- Open up the applicable project.
- Grant Cloud KMS Admin and Cloud KMS Crypto Operator roles to the service account. (required)
After creating the service account, create a new JSON key by following these steps:
- Go to Menu > IAM & Admin > Service Accounts in the Google Cloud console.
- Select your service account.
- Click Keys > Add key > Create new key.
- Select JSON, then click Create.
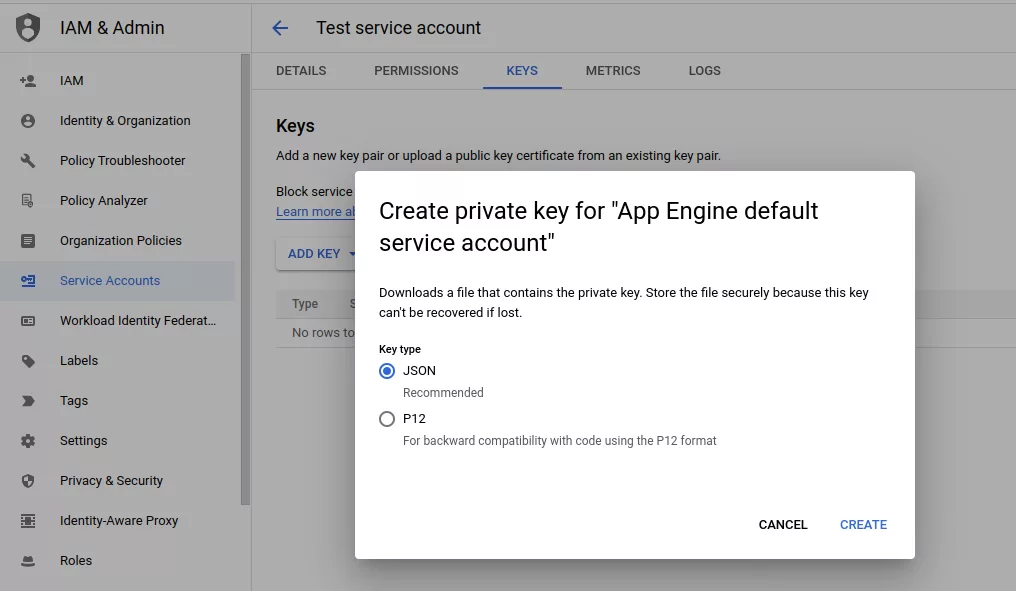
Your new public/private key pair is generated and downloaded to your machine as a new file. Save the downloaded JSON file as credentials.json in your working directory.
Set the environment variable GOOGLE_APPLICATION_CREDENTIALS to the path of your private key JSON file using the following command:
export GOOGLE_APPLICATION_CREDENTIALS="/absolute/path/to/credentials/file.json"Note: (Update the path to where you’ve stored the file.)
Configuration Done!
You’ve configured OpenSSL to use Google KMS as a PKCS #11 provider.
If you need to troubleshoot your connection to Google KMS, Install the pkcs11-tool with the following code:
sudo apt install openscNow you need to run pkcs11-tool –module /path/to/libkmsp11.so –list-objects to see the list of keys you can access. (Update the path to where you’ve stored the file.)
Generate CSR With OpenSSL
You can now generate the CSR using a command like this:
openssl req -new -subj '/CN=Your Company Name, LLC/' -sha256 -engine pkcs11 -keyform engine -key pkcs11:object=your_key_name Replace the following:
- CERTIFICATE_NAME: a name for the certificate that you want to generate.
- DIGEST_FLAG: a flag indicating the type of digest. Use -sha256, -sha384, or -sha512 depending on the algorithm of the key.
- KEY_ID: the fully qualified resource ID of an asymmetric signing key version—for example,
- REQUEST_NAME: a name for the certificate signing request.
Make sure you use the correct -sigopt options for the type of key that you’re using.
You can’t use an object ID longer than 100 characters with OpenSSL. Use short KeyRing and CryptoKey names, or use pkcs11:object=KEY_NAME instead. For more information on the OpenSSL object ID limit, see the related issue on GitHub.
Submit the CSR to Your Certificate Provider/CA
Now that you have your CSR, you can provide it to your code signing certificate provider to obtain the code signing certificate. Complete the certificate enrollment/generation process with your certificate provider, submitting the CSR and key attestation when prompted.
Important: The key attestation file must be a zip file. Google Cloud offers two different places/formats where you can download an attestation file; be sure you get the .zip version.
Sign the Code/Artifact Using SignTool
After your code signing certificate has been issued, you can use it to sign executables. Here are instructions for signing with SignTool on a Windows machine:
- Ensure that you have SignTool installed on your computer.
- Install the latest Google Cloud KMS CNG provider release on your Windows machine using the .msi installer.
- Run gcloud auth application-default login to authenticate your machine to Google Cloud.
You’ll now be able to sign your executable using SignTool with the following command:
signtool sign /v /debug /fd sha256 /t http://timestamp.sectigo.com /f path/to/mycertificate.crt /csp "Google Cloud KMS Provider" /kc projects/PROJECT_ID/locations/LOCATION/keyRings/KEY_RING/cryptoKeys/KEY_NAME/cryptoKeyVersions/1 path/to/file.exeNote: (Update the path to where you’ve stored the certificate file.)
Conclusion
Looking to secure your code with Sectigo Code Signing Certificates? SignMyCode offers both Sectigo Code Signing and Sectigo EV Code Signing at affordable prices. Buy now and enjoy hassle-free code signing with Google Cloud KMS (Key Management Service).

Cloud Code Signing
Seamless Automated Code Signing Tasks without Need of Physical HSM or Token using Cloud Code Signing Certificate.
Code Signing as a Service
