
How to Configure DigiCert KeyLocker on Windows?

What is DigiCert KeyLocker?
DigiCert KeyLocker is a code signing solution that is run in the cloud, instead of requiring private keys to be kept on a local machine, enhances security by not allowing unauthorized local access.
Developers can use DigiCert KeyLocker to securely sign software, drivers, and applications using certificates stored securely in the cloud.
If you are using a DigiCert Code Signing Certificate or DigiCert EV Code Signing Certificate, when you configure DigiCert KeyLocker, it will provide smooth authentication and integrity for code-signed software.
Requirements for Configuring DigiCert KeyLocker
Requirements for configuring DigiCert KeyLocker include confirming the issuance status of the certificate, roles or permissions, secure environment, and access to DigiCert ONE for credential management.
We will go through each prerequisite below:
Verify Certificate Issuance Status
Before you begin with the Keylocker configuration, you will want to ensure your Code Signing or EV Code Signing certificate has been issued. After you log into your DigiCert CertCentral account, you can determine the status of your certificate order.
If the status of your certificate order is “Pending“, you will need to log into DigiCert ONE and sync in order to proceed.
If the status of your certificate is “Issued” you can proceed with the configuration steps without needing to sync the KeyLocker account.
Note: It is important to make sure the certificate is active and issued because an incomplete certificate order will also block KeyLocker from operating as designed.
Required Permissions
You must have administrator access on your Windows machine to configure DigiCert KeyLocker.
It is considered an application installation, and it includes modifying security credentials and setting up an authentication method at the system level, so you will need elevated privileges to perform these actions.
If you do not have admin rights, please check with your IT admin or security team before continuing.
Things will not work when you do not have the correct permissions, and the installation and configuration of the KeyLocker client experience will fail, and you won’t be able to sign securely in the cloud.
Secure Environment KeyLocker
Secure Environment KeyLocker eliminates the need to store private keys locally, which is designed to make you more secure!
However, since you will be using API tokens and issued authentication certificates, you must handle the secure access artifacts carefully.
You must never share the API keys, client authentication certificates (.p12), and passwords through insecure communication methods, such as email or chat applications. Rather, you should use a password manager or secure vault for storing such things.
Note: DigiCert ONE will only display API keys and certificate passwords one time, so if you do not securely save them, you will not be able to authenticate KeyLocker and will need to reset.
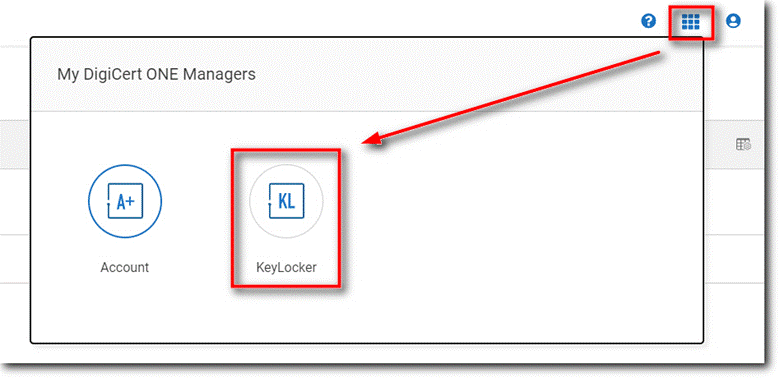
Accessing DigiCert ONE
As KeyLocker is managed using DigiCert ONE, you must have a workable DigiCert ONE account, and KeyLocker must be enabled on your account. Permissions will need to be enabled.
You will create API keys, create the client authentication certificates, and download the required files from the DigiCert ONE dashboard.
Note: If you do not already have access, please verify that your organization’s DigiCert administrator has provided the necessary KeyLocker permissions. If you do not have access to the DigiCert ONE dashboard, you will not be able to complete the KeyLocker setup.
Steps to Configure a DigiCert KeyLocker on Windows
Once you have obtained all your requirements, you can now move to configure DigiCert KeyLocker for the Windows environment.
You will create authentication credentials, install the KeyLocker client tools, and configure your environment to sign code securely with cloud-based signing, and we are going to detail each of those steps below.
Step 1: Set up Credentials & DigiCert Client Tools
Create API Key, Client Authentication Certificate in DigiCert ONE
- To access DigiCert KeyLocker, you will first need to create an API key and a client authentication certificate to authenticate the signing device.
- Log in to your DigiCert ONE account and access the KeyLocker page.
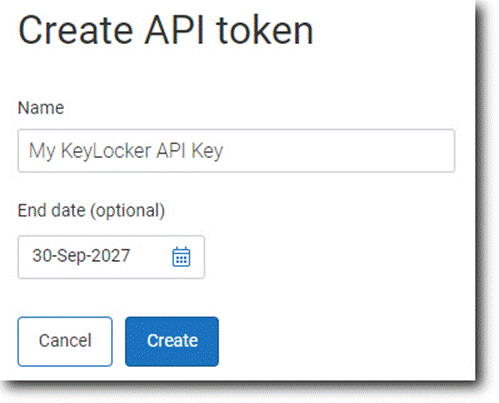
- From this page, click on “Get Started” and follow the prompts to create an API token.
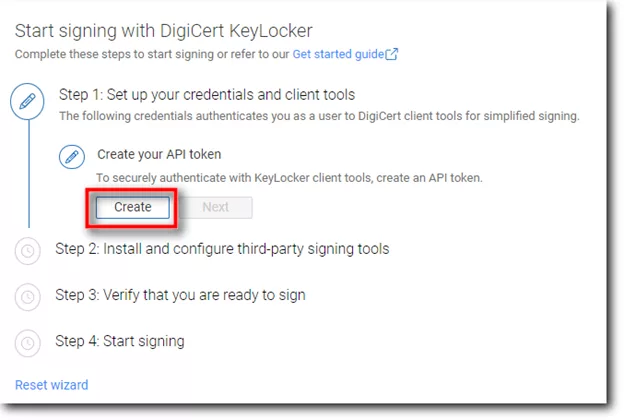
- Provide a name (choose something recognizable), an expiration date for the API token, and click ‘Create’ (be sure to securely store a copy of this API token, since the token will never again be viewable after you exit the window).
- Next, you will need to create a client authentication certificate.
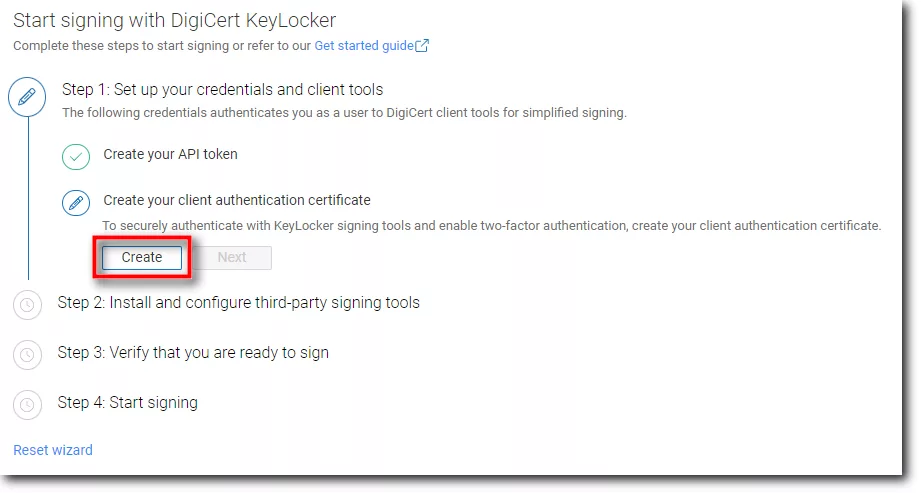
- Click Create again on the section for client authentication certificate and provide a nickname and expiration date for the certificate before creating it.
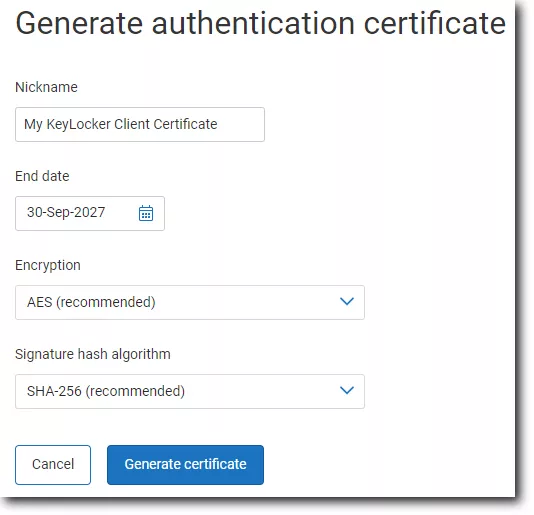
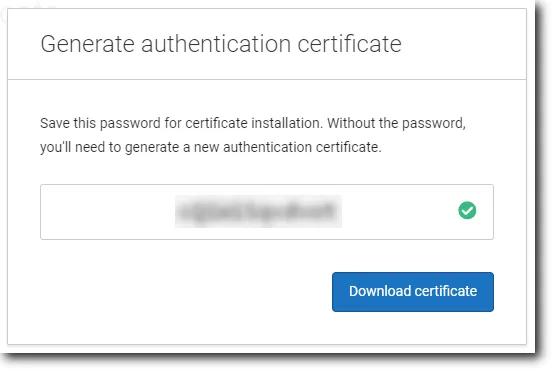
Once created, the password for the certificate will be displayed for your use. The password will only display once, so be sure to store that securely. Be sure to download the .p12 certificate file, which will be used later in the setup of KeyLocker on your computer.
When you have completed these steps, go back and click on ‘Next’ button under Create your client authentication certificate.
Now, you have created the credentials to perform a secure signing operation. Now, it’s time to setup the client tools.
Download and Install the DigiCert KeyLocker tools
Once you have your authentication credentials in hand, the next step is to set up the DigiCert KeyLocker client tools, which are necessary for signing operations on Windows.
To do so, return to the KeyLocker dashboard, then click Download KeyLocker Tools.
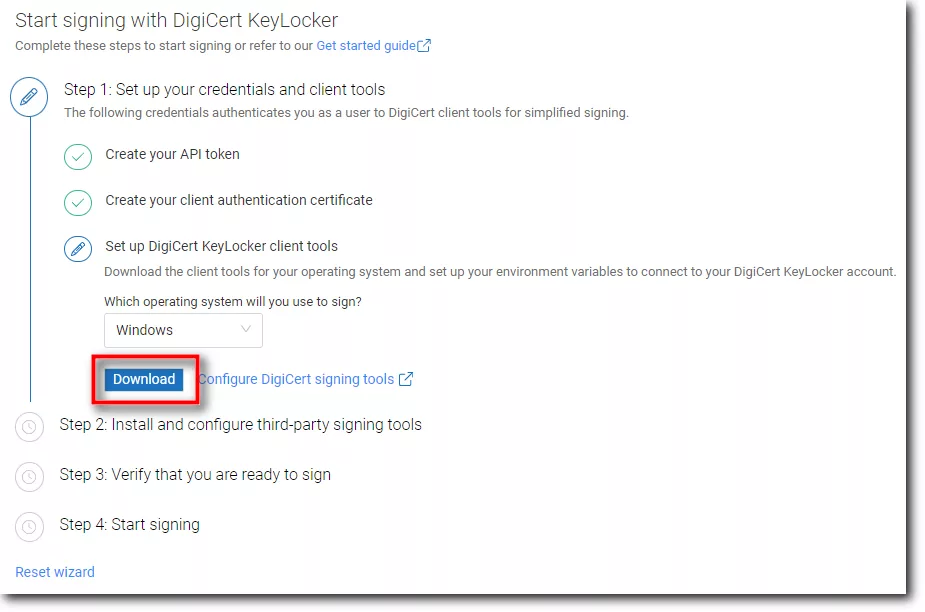
You will download an executable file (the file will generally be named Keylockertools-windows-x64.exe).
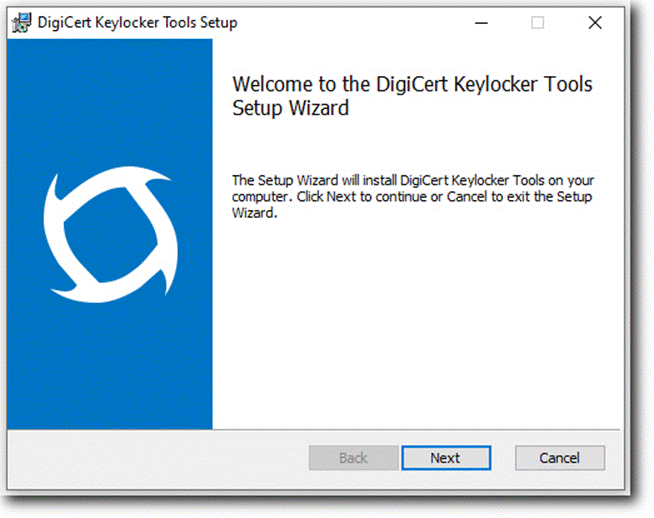
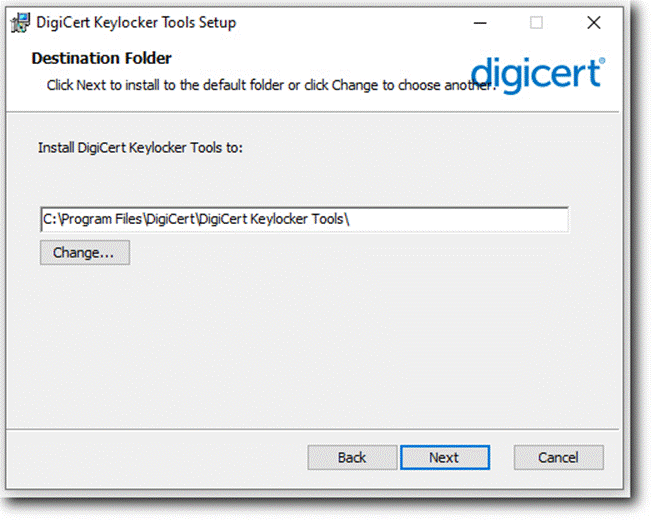
- Download and install the client tools Installer. Launch the installer and follow the installation instructions.
- Accept the license agreement, and validate the installation directory path
- Confirm the path.
- Click on the ‘install’ button.
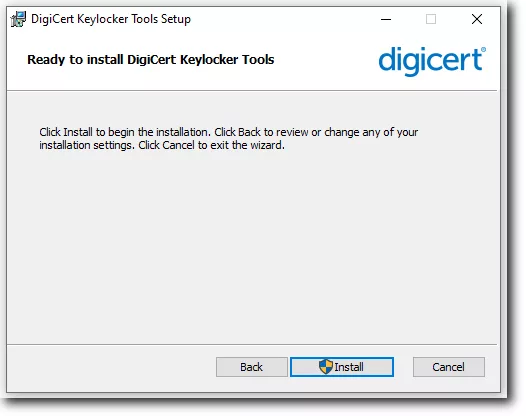
- The installation process should take a few minutes to complete, after which you will see a finish button.
- Once the installation has completed, you will have successfully installed KeyLocker client tools that allow your system to connect with DigiCert ONE for code signing.
Now, you have all essential credentials and windows configurations. Next step is to configure your credentials for your preferred signing tool, along with the library.
Step 2: Import the Client Authentication Certificate
Now that you have the KeyLocker tools installed, you must import the client authentication certificate into the Windows Certificate Manager.
To open Certificate Manager, open the Windows Run dialog box (Win + R), type certmgr.msc, and press Enter.
In Certificate Manager, navigate to Personal > Certificates, right-click inside the window and select Import.
Navigate to locate the .p12 client authentication certificate downloaded earlier, and provide the password when prompted to successfully complete the import process. This ensures that your system recognizes the authentication certificate for secure signing operations.
Step 4: Setup KeyLocker on Windows Using Command Line
Once you import the client authentication certificate, you will need to configure the KeyLocker settings using the command line:
cd C:\Program Files\DigiCert\KeyLockerTools
Open Command Prompt (cmd) as an Administrator, and then change the location to the KeyLocker tools installation directory by using the command:
“keylocker-cli configure --api-token YOUR_API_KEY --cert-path "C:\Path\To\ClientCert.p12"Now you will want to run the following command to make the connection for DigiCert KeyLocker to your signing machine:
Make sure to replace “YOUR_API_KEY” with the API token you generated previously and “C:\Path\To\ClientCert.p12” “PATH_TO_YOUR_CERTIFICATE_AUTHENTICATION_FILE” with the actual location for the client authentication certificate.
If prompted, enter the certificate password to finish the configuration. This configuration allows KeyLocker to authenticate your machine and retrieve your code signing certificate from the cloud when your code-signing request is made.
Step 5: Execute a Sign & Test Code Signing Activity
After finishing the KeyLocker configuration, it is time to test it by signing a sample executable (.exe, .dll, or .msi). Find an executable file on your computer and enter the following SignTool command to sign it using KeyLocker:
signtool sign "Your_Certificate_Password" /tr http://timestamp.digicert.com /td SHA256 "C:\Path\To\TestFile.exe"Replace “C:\Path\To\ClientCert.p12” with the location of your client authentication certificate, “Your_Certificate_Password” with the password you saved earlier, and “C:\Path\To\TestFile.exe” with the file you want to sign.
To Verify the Signature, run:
signtool verify /pa "C:\Path\To\TestFile.exe"If the verification is successful, it confirms that your DigiCert KeyLocker is properly configured and working as expected.
Conclusion
Get EV Code Signing and Standard Code Signing Certificates from reputable Certificate Authorities (CAs) to protect your software from tampering and unauthorized modifications. Sign safely and securely with SignMyCode today!

Cloud Code Signing
Seamless Automated Code Signing Tasks without Need of Physical HSM or Token using Cloud Code Signing Certificate.
Code Signing as a Service
