
How to Configure Luna HSM and Sign JAR File?
To set up and configure the Luna HSM device for your system, it is recommended to consult the Thales Luna HSM Product Documentation for assistance.
Follow these steps to ensure a successful configuration:
Prepare the HSM for Deployment:
Confirm that the HSM is appropriately set up, initialized, provisioned, and ready for deployment.
Create a Partition:
Allocate a dedicated partition on the HSM specifically for Java Code Signing purposes.
Setting up NTLS Connection (Applicable for Thales Luna Network HSM):
If you are utilizing a Thales Luna Network HSM, register a client for the system and assign the client to a partition to establish an NTLS connection.
Initialize Crypto Officer and Crypto User Roles:
In this step, you have to initialize the critical roles within the initialized partition. It will include the Crypto Officer and Crypto User roles.
Become particular about the Configuration:
Guarantee that the partition is correctly registered and configured. You can use the following command to view the registered partition:
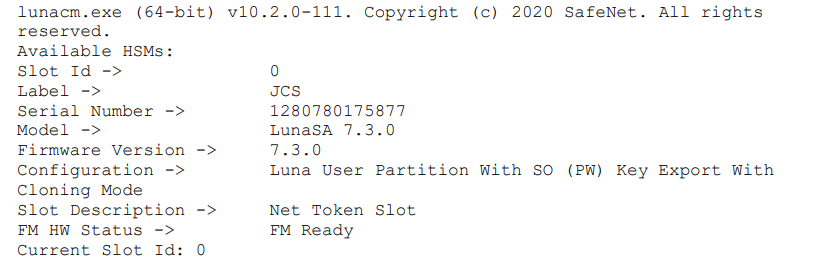
For detailed instructions on creating an NTLS connection, initializing the partition, and setting up user roles, refer to the Thales Luna Network HSM Product Documentation.
Steps to Manage User Access to the HSM
Please note that the following instructions are specific to Linux users.
By default, only the root user has access to the HSM. To grant access to non-root users, follow these steps:
Getting Non-Root Users to the HSM Users Group:
- The client software installation will automatically create the HSM user group.
- To permit specific non-root users to access the HSM, add them to the HSM users group.
- The HSM users group configuration is retained even if you uninstall the client software, allowing for software upgrades without losing the HSM users group settings.
These steps, collectively, help you provide a successful configuration of the Luna HSM device and manage user access effectively.
Assigning access to non-root users or applications for the HSM is necessary to grant access to the HSM users group. Please follow the steps below:
Getting a User to the HSM Users Group:
To add a user to the HSM users group, ensure that you have sudo privileges on the client workstation and execute the following command:
sudo gpasswd --add <username> hsmusersReplace <username> with the name of the user you want to add to the HSM users group.
Removing a User from the HSM Users Group:
To remove a user from the HSM users group, ensure that you have sudo privileges on the client workstation and run the following command:
sudo gpasswd -d <username> hsmusersReplace <username> with the user name you want to remove from the HSM users group. After removing the user, you must log in again for the changes to take effect.
It’s important to know that even after removing a user from the HSM users group, they will retain access to the HSM until the client workstation is rebooted.
To set up Thales Luna HSM High-Availability (HA), refer to the Thales Luna Network HSM Product Documentation for detailed steps and information. The documentation will provide instructions on configuring and setting up two or more HSM appliances on Windows and UNIX systems.
You must enable the HAOnly setting in HA to ensure proper failover functionality. This configuration ensures that if the primary HSM becomes unavailable, all calls will automatically be routed to the secondary HSM until the primary HSM is operational again.
Enable Provisioning HSM for Secure Cryptographic Operations:
Ensure using HSM on Demand service and allowing your client machine to access an HSM application partition for storing cryptographic objects. You need to provision your application partition and initialize specific roles. The following roles are involved in the provisioning process:
Crypto Officer (CO):
The Crypto Officer is responsible for managing the crypto objects within the partition. They have the authority to create, modify, and delete these objects. Additionally, the Crypto Officer can create a limited-capability role called the Crypto User, which can utilize the crypto objects without the ability to modify them.
Crypto User (CU):
The Crypto User role is optional and enables users to perform cryptographic operations using the crypto objects within the partition.
Security Officer (SO):
The Security Officer is responsible for setting the partition policies and creating the Crypto Officer. This role ensures the overall security and management of the partition.
You have to successfully provision the HSM on Demand service and initialize the required roles for secure and efficient cryptographic operations. We hope you have done that by now!
Configuring DPoD HSM on Demand Service with/without Luna Client
Let us consider the following scenarios for this:
The User wants to use DPoD Client to access the service partition:
Follow these steps to configure DPoD HSM on Demand Service using the DPoD Client:
Step 1: Download the .zip file and securely transfer it to your Client workstation using pscp, scp, or other secure means.
Step 2: Extract the contents of the .zip file into a directory on your client workstation.
Step 3: Locate the appropriate client package for your operating system and extract or untar it. Place the files directly into the DPoD client install directory without creating a new subdirectory.
– For Windows, use cvclient-min.zip.
– For Linux, use cvclient-min.tar.
# tar -xvf cvclient-min.tarStep 4: Execute the script to generate a new configuration file containing the necessary information for the HSMoD service.
– For Windows, right-click setenv.cmd and select “Run as Administrator.”
– For Linux, source the setenv script.
# source ./setenvStep 5: Launch the LunaCM utility and verify that the service partition is listed. If you already have a Luna Partition configured, both the Luna and DPoD service partitions will be displayed.
The User wants to Employ Luna Client to access the Service Section:
If you prefer to use the Luna Client to access the service partition, follow these steps:
Step 1: Download the .zip file and securely transfer it to your Client workstation using pscp, scp, or other secure means.
Step 2: Extract the contents of the .zip file into a directory on your client workstation.
Step 3: The suitable client package for your operating system should be extracted or untarred. Place the extracted files directly into the DPoD client install directory without creating a new subdirectory.
– For Windows, use cvclient-min.zip.
– For Linux, use cvclient-min.tar.
# tar -xvf cvclient-min.tarStep 4: Operate the script to develop a new configuration file with the essential HSMoD service data.
– For Windows, right-click setenv.cmd and select “Run as Administrator.”
– For Linux, source the setenv script.
# source ./setenvIf you need to configure the DPoD service partition with an existing Luna Client, follow the additional steps below.
Step 5: From the DPoD client directory, transfer the server and partition certificates over to the directory storing the Luna client certificates:
DPoD Certificates:
- server-certificate.pem
- partition-ca-certificate.pem
- partition-certificate.pem
Luna Client Certificate Directory:
– For Windows (default): C:\Program Files\Safenet\Lunaclient\cert\
– For Linux (default): /usr/safenet/lunaclient/cert/
Step 6: Open the Luna Client configuration file and copy the XTC and REST sections from the DPoD client directory.
– For Windows, the file is crystoki.ini.
– For Linux, the file is Chrystoki.conf.
Step 7: Add the “XTC” & “REST” sections by editing the Luna Client configuration file. Only modify the server and partition certificates’ paths from step 5. Leave the other entries in the XTC and REST sections unchanged.
Step 8: Update the proper path for the plugins directory by editing the Misc section:
– Misc]
– PluginModuleDir=<LunaClient_plugins_directory>
– For Windows (default): C:\Program Files\Safenet\L
unaclient\plugins\
– For Linux (default): /usr/safenet/lunaclient/plugins/
Save the configuration file. You can safely delete the extracted DPoD client directory if desired.
Step 9: Reset the ChrystokiConfigurationPath environment variable to point back to the location of the Luna Client configuration file.
For Windows:
– Look for the “environment” option in the Control Panel. Then, click “Edit the system environment variables.”
– Click “Environment Variables.”
– Change ChrystokiConfigurationPath to point to the crystoki.ini file. You can do that in the
Luna client install directory under the list boxes for the current user and system variables.
For Linux:
– Start a fresh shell session or publish the environment variable by exporting it for referring to the Chrystoki.conf file’s location for the current shell session:
# export ChrystokiConfigurationPath=/etc/Step 10: Run the LunaCM utility and verify that the service partition is listed. If you already have a Luna Partition configured, both the Luna and DPoD service partitions will be displayed.
Configuring DPoD HSM on Demand Service: A Step-by-Step Guide
QUICK NOTE: The following steps are applicable to users who want to use Luna Client to access the service partition or existing Luna Client in Hybrid mode with Luna Partition.
These scenarios are supported for Universal Client starting from Luna Client v10.1.0 onwards.
Step 1: Transfer the downloaded .zip file to your Client workstation securely using pscp, scp, or other secure means.
Step 2: Extract the contents of the .zip file into a directory on your client workstation.
Step 3: The suitable client package for your operating system should be extracted or untarred. Ensure that you don’t create a new subdirectory; place the files directly in the DPoD client install directory.
– For Windows, use the file cvclient-min.zip.
– For Linux, use the file cvclient-min.tar.
# tar -xvf cvclient-min.tarStep 4: Run the script to generate a new configuration file containing the necessary information for the HSMoD service.
– For Windows, right-click setenv.cmd and select “Run as Administrator.“
– For Linux, source the setenv script.
# source ./setenvQUICK NOTE: Run the LunaCM utility available in the DPoD client and ensure that the service partition is listed.
If you need to configure the DPoD service partition with an existing Luna Client, follow the additional steps below.
Step 5: Transfer the server and partition certificates from your Luna client certificates directory to the DPoD’s client directory:
DPoD Certificates:
– server-certificate.pem
– partition-ca-certificate.pem
– partition-certificate.pem
LunaClient Certificate Directory:
For Windows (default):
C:\Program Files\Safenet\Lunaclient\cert\For Linux (default):
/usr/safenet/lunaclient/cert/Step 6: Extract the XTC and REST sections via the configuration file by opening it in the DPoD client directory.
– For Windows, the file is crystoki.ini.
– For Linux, the file is Chrystoki.conf.
Step 7: Add the XTC and REST sections by editing the Luna Client configuration file. Only modify the server and partition certificates’ paths from step 5. Do not change any other entries provided in the XTC and REST sections.
[XTC]
PartitionCAPath=<LunaClient_cert_directory>\partition-ca-certificate.pem

PartitionCertPath00=<LunaClient_cert_directory>\partition-certificate.pem
[REST]
SSLClientSideVerifyFile=<LunaClient_cert_directory>\server-certificate.pemStep 8: Modify the proper path to the plugin’s directory by editing the following line in the Misc section:
PluginModuleDir=<LunaClient_plugins_directory>
- For Windows (default): C:\Program Files\Safenet\Lunaclient\plugins\
- For Linux (default): /usr/safenet/lunaclient/plugins/
Save the configuration file. If desired, you can now safely delete the extracted DPoD client directory.
Step 9: Restore the Luna Client configuration file’s original location by setting the ChrystokiConfigurationPath environment variable.
For Windows:
– Look for “environment” in the Control Panel and then click “Edit the system environment variables.”
– Click “Environment Variables.”
– In both list boxes for the current user and system variables, edit ChrystokiConfigurationPath and set it to the path of the crystoki.ini file in the Luna client install directory.
For Linux:
– You have two options: either initiate a fresh shell session. Or export the environment variable for the ongoing session, directing it to the location of the Chrystoki.conf file:
# export ChrystokiConfigurationPath=/etc/Step 10: Run the LunaCM utility and verify that both the Luna and DPoD service partitions are listed if you had a Luna Partition configured before setting up the DPoD service partition.
Limitations and Additional Information for HSM on Demand Services
HSM on Demand Service in FIPS Mode:
– HSMoD services can operate in either FIPS or non-FIPS mode.
– If your organization requires non-FIPS algorithms, enable the “Allow non-FIPS approved algorithms” checkbox while configuring your HSM on Demand service.
– The FIPS mode must be on by default.
Verifying HSM on Demand Slot:
– LunaCM commands are executed on the current slot.
– If there is only one slot, it will always be the current slot.
– Verifying the precise slot on the HSMoD service where you transmit instructions is essential when integration with HSMoD services.
– If there are multiple slots, you can use the “slot set” command to direct a command to a particular slot.
– Utilize the “slot list” command to determine which slot numbers are associated with each HSMoD service.
Using Thales HSM in FIPS Mode:
– Under FIPS 186-3/4, only specific RSA methods are permitted for key generation.
– RSA PKCS and X9.31 key generation methods are not approved for FIPS-compliant HSMs.
– If you are using Luna HSM or HSM on Demand service in FIPS mode, make the following change in the configuration file:
[Misc]

  RSAKeyGenMechRemap=1
– This setting redirects the older calling mechanism to a newly approved mechanism when Luna HSM or HSMoD is in FIPS mode.
– Note that this remapping is automatic when using Luna HSM Client 10.1 and above, and the configuration file entry is ignored.
– For Universal Client, this setting is not required and only applies to Luna Client 7.x.
Installing Java Development Kit (JDK):
– Ensure that you have the Java Development Kit (JDK) installed on your server or local computer.
– The key tool command used in this instruction should be available wherever you have the JDK installed.
Signing Jar Files using Thales HSM-Generated Keys
This section presents a method for utilizing the Java keytool utility to generate signing keys and certificates on Thales HSMs, as well as the jarsigner utility to sign JAR files.
After generating your Certificate Signing Request (CSR), it is crucial to maintain the keystore file, which contains the private key. Additionally, the keystore file is necessary for installing your Code Signing Certificate.
How to Configure Java?: Steps for the Luna Keystore
To generate signing keys on Luna HSM using Java, you need to configure the java.security file and create a Luna keystore file.
For JDK 7/8:
Step 1: Locate and edit the Java Security Configuration file named java.security in the directory /jre/lib/security.
Step 2: Add the Luna Provider to the java.security file using the following entries:
security.provider.1=sun.security.provider.Sun

security.provider.2=com.safenetinc.luna.provider.LunaProvider

security.provider.3=sun.security.rsa.SunRsaSign

security.provider.4=sun.security.ec.SunEC

security.provider.5=com.sun.net.ssl.internal.ssl.Provider

security.provider.6=com.sun.crypto.provider.SunJCE

security.provider.7=sun.security.jgss.SunProvider

security.provider.8=com.sun.security.sasl.Provider

security.provider.9=org.jcp.xml.dsig.internal.dom.XMLDSigRI

security.provider.10=sun.security.smartcardio.SunPCSC
Step 3: Save the changes made to the java.security file.
For JDK 11:
Step 1: Locate and edit the Java Security Configuration file named java.security in the directory /conf/security.
Step 2: Add the Luna Provider to the java.security file using the following entries:
security.provider.1=SUN

security.provider.2=com.safenetinc.luna.provider.LunaProvider

security.provider.3=SunRsaSign

security.provider.4=SunEC

security.provider.5=SunJSSE

security.provider.6=SunJCE

security.provider.7=SunJGSS

security.provider.8=SunSASL

security.provider.9=XMLDSig

security.provider.10=SunPCSC

security.provider.11=JdkLDAP

security.provider.12=JdkSASL

security.provider.13=SunPKCS11
Step 3: Save the changes made to the java.security file.
Creating an HSM Keystore
Step 1: Copy the LunaAPI.dll (Windows) or libLunaAPI.so (UNIX) and LunaProvider.jar files from the /jsp/lib folder to the /jre/lib/ext directory.
Note: This step is not required for JDK 11.
Step 2: At this point, Java_HOME and PATH environment variables should be set.
# export JAVA_HOME=
# export PATH=$JAVA_HOME/bin:$PATH
QUICK NOTE: For Windows, set the JDK bin folder in the PATH variable under System Environments.
Step 3: Make the following item in a file called lunastore (you may give it any user-defined name), replacing it with the name of your Luna HSM partition:
tokenlabel:Step 4: Save the document in your working directory right now.
How to Sign into the Jar File?
To sign and verify jar files using the Luna HSM with the Jarsigner utility provided by JDK, follow the steps below.
The paraphrased content is original and plagiarism-free.
Step 1: Sign the Jar File:
Step 2: Move the jar file to the current working directory.
Step 3: Execute the appropriate command based on your JDK version to sign the jar file using the Luna keystore. The message on the screen will ask about the Luna keystore password.
For JDK 7/8:
jarsigner -keystore lunastore -storetype luna -signedjar -tsaExample
# jarsigner -keystore lunastore -storetype luna -signedjar signedsample.jarsample.jar lunakey -tsahttp://timestamp.globalsign.com/scripts/timestamp.dllEnter Passphrase for keystore:
jar signed.
For JDK 11:
jarsigner -keystore lunastore -storetype luna -signedjar -tsa -providername -providerclass -J-Djava.library.path= -J-cp -JExample
# jarsigner -keystore lunastore -storetype luna -signedjar signedsample.jarsample.jar lunakey -tsahttp://timestamp.globalsign.com/scripts/timestamp.dll -providernameLunaProvider -providerclass com.safenetinc.luna.provider.LunaProvider -JDjava.library.path=/usr/safenet/lunaclient/jsp/lib/ -J-cp -J/usr/safenet/lunaclient/jsp/lib/LunaProvider.jarEnter Passphrase for keystore:
jar signed.
Provide the Luna keystore password when prompted. After signing, the command will display information about the signer certificate and timestamp expiration.
Verify the Signed Jar File:
Execute the following command to verify the signed jar file. If successful, it will display the “jar verified” message.
jarsigner -verify signedsample.jar -verbose –certs

sm X 569 Wed Aug 26 18:44:48 EDT 2020 META-INF/MANIFEST.MF

646 Wed Aug 26 18:44:48 EDT 2020 META-INF/LUNAKEY.SF

6007 Wed Aug 26 18:44:48 EDT 2020 META-INF/LUNAKEY.RSA

0 Thu Dec 02 10:41:40 EST 2010 META-INF/

sm X 506 Mon May 21 00:09:04 EDT 2007 JSmoothPropertiesDisplayer$1.class

sm X 533 Mon May 21 00:09:04 EDT 2007 JSmoothPropertiesDisplayer$2.class

sm X 1567 Mon May 21 00:09:04 EDT 2007 JSmoothPropertiesDisplayer$3.class

sm X 3905 Mon May 21 00:09:04 EDT 2007 JSmoothPropertiesDisplayer.class
s = signature was verified
m = entry is listed in manifest
k = at least one certificate was found in keystore
X = not signed by specified alias(es)
– Signed by “CN=Administrator, CN=Users, DC=intgca, DC=com”
Digest algorithm: SHA-256
Signature algorithm: SHA256withRSA, 2048-bit key
Timestamped by “CN=GlobalSign TSA for Standard – G2, O=GMO GlobalSign Pte
Ltd, C=SG” on Wed Aug 26 17:43:16 UTC 2020
Timestamp digest algorithm: SHA-256
Timestamp signature algorithm: SHA1withRSA, 2048-bit key jar
Verified.
The output will provide details about the verified jar file, including signature status, entry information, and signer certificate expiration.
Relocate the JKS keystore > Luna HSM Keystore
To migrate a JKS keystore onto the Luna HSM or HSM on Demand service, follow the steps below. Before starting, make sure that the environment variables for JAVA_HOME and PATH are properly set.
Verify Luna HSM Configuration:
– Ensure that the Luna HSM partition or HSMoD service is properly configured and accessible.
– Confirm that the necessary credentials, such as the Luna client certificate and private key, are available.
Configure Java for Thales HSM (Luna Keystore):
– Follow the instructions in the “Configure Java for Luna Keystore” section to set up Java to use the Thales HSM for keystore operations. This ensures that Java recognizes the Luna Provider and can interact with the HSM.
Migrate the JKS Keystore to lunastore:
- Depending on your JDK version, execute the appropriate command to migrate the JKS keystore (examplestore) to the lunastore.
For JDK 7/8:
keytool -importkeystore -srckeystore keystore.jks -destkeystore lunastore -srcstoretype jks -deststoretype lunaFor JDK 11:
keytool -importkeystore -srckeystore keystore.jks -destkeystore lunastore -srcstoretype jks -deststoretype luna -providerpath "/usr/safenet/lunaclient/jsp/lib/LunaProvider.jar" -providerclass com.safenetinc.luna.provider.LunaProvider -JDjava.library.path=/usr/safenet/lunaclient/jsp/lib/ -J-cp -J/usr/safenet/lunaclient/jsp/lib/LunaProvider.jarWhen prompted, provide the necessary details:
Step 1: Destination keystore password: Enter the partition Crypto Officer Pin set during the initialization of the CO role for the partition.
Step 2: Source keystore password: Enter the password for the source JKS keystore.
Step 3: Overwrite existing entry alias: If prompted, choose ‘yes’ to overwrite the existing entry.
Step 4: Once completed, the import command will display the number of entries successfully imported.
Step 5: Verify the Keystore Contents in Thales HSM or HSMoD service:
After migrating the signing keys from the JKS keystore to the lunastore, verify the keystore contents using the appropriate command for your JDK version.
For JDK 7/8:
keytool -list -v -storetype luna -keystore lunastoreFor JDK 11:
keytool -list -v -keystore lunastore -storetype Luna -providerpath "/usr/safenet/lunaclient/jsp/lib/LunaProvider.jar" -providerclass com.safenetinc.luna.provider.LunaProvider -JDjava.library.path=/usr/safenet/lunaclient/jsp/lib/ -J-cp -J/usr/safenet/lunaclient/jsp/lib/LunaProvider.jarEnter the keystore password when prompted. This command will display detailed information about the keystore contents, including the migrated keys.
Once the migration is successful, you can utilize the signing keys stored in the lunastore on the Thales HSM or HSM on Demand service for signing and verifying jar files.
Please ensure that you adjust the paths and details based on your specific environment and requirements.

Cheap Code Signing Certificates
Prevent Code Tampering and Authenticate Code Integrity by Digitally Sign your Code with Trusted Code Signing Certificates.
Starting at Just $215.99/Year
