
Step-wise Guide: Token-Based JAR Signing in MAC OS X Environments
Importance of Token-Based JAR Signing in MAC OS X
JAR (Java Archive) files can be signed in macOS environments using a token-based approach for added security. This method involves using a hardware token or smart card to store the private key for signing the JAR file. The private key never leaves the token, protecting unauthorized access or tampering.
Buy Java Code Signing Certificate
Sign unlimited JAR Files and Java Applets using Standard and Extended Validation Java Code Signing Certificate with Tokens.
Token-based JAR signing adds an extra layer of security since the private key used for signing is stored within a hardware token or smart card. It helps protect against key compromise, unauthorized access, or malicious tampering.
Additionally, it provides more substantial assurance of the signer’s identity by binding the public key to a digital certificate issued by a trusted CA.
How is this Schematic Process Carried out?
Since we have decided to go step-by-step for token-Based JAR Signing in MAC OS X Environments, so, we have provided an overview of the process below:
Acquire a Hardware Token:
Obtain a hardware token or smart card that supports storing cryptographic keys. These tokens typically connect to the computer via USB or another interface.
Generate a Key Pair:
Use a cryptographic tool to generate a private key and a corresponding public key. The private key is securely stored within the hardware token.
Obtain a Code Signing Certificate:
Request a code signing certificate from a trusted Certificate Authority (CA). This certificate binds your public key to your identity. The CA will typically provide the certificate in a format such as X.509.
Import the Private Key:
Using specialized software or utilities, import the private key generated in step 2 into the hardware token. This process securely transfers the private key to the token’s storage.
Configure the Token:
Set up the hardware token with the necessary configurations, such as PINs or passwords to access the private key. Follow the instructions provided by the token’s manufacturer or software vendor.
Sign the JAR File:
Use the appropriate tool or utility provided by the Java Development Kit (JDK) or other software to sign the JAR file. Specify the private key stored in the hardware token as the signing key. The signing process generates a digital signature that verifies the integrity and authenticity of the JAR file.
Verification and Trust:
When the JAR file is distributed, recipients can verify its authenticity by checking the digital signature against the public key stored in the associated certificate. The certificate is usually included with the JAR file or available through a trusted Certificate Authority.
Procedure to Configure JDK
To ensure your setup process goes smoothly, follow the steps below to install the 32-bit JDK and create the necessary files for MAC OS X JarSigning:
Step 1: Begin by installing the 32-bit JDK on your computer. Once the installation is complete, proceed to locate the JDK bin folder. By default, you can find it at:
Computer\Mac OS X\Library\Java\JavaVirtualMachine\jdkx.x.x_xxx\Contents\Home\binStep 2: To create the required file, eToken.cfg, open a text editor that supports multiple file formats.
Step 3: Within the bin folder, create a new file named eToken.cfg and input the following content:
// Content of eToken.cfg
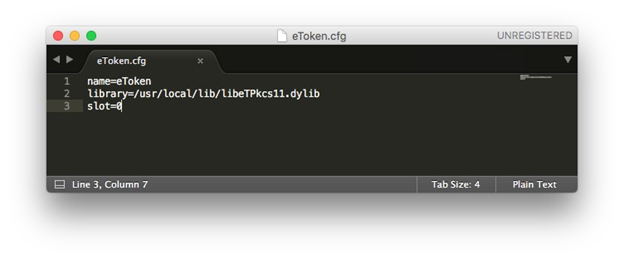
Step 4: Once you have entered the necessary content, save the eToken.cfg file within the bin folder.
Step 5: Right-click on the bin folder and select “Get Info” from the context menu. A window with information about the bin folder will appear.
Step 6: Locate and click on the padlock icon in the bottom-right corner of the information window. This step will prompt you to authenticate yourself.
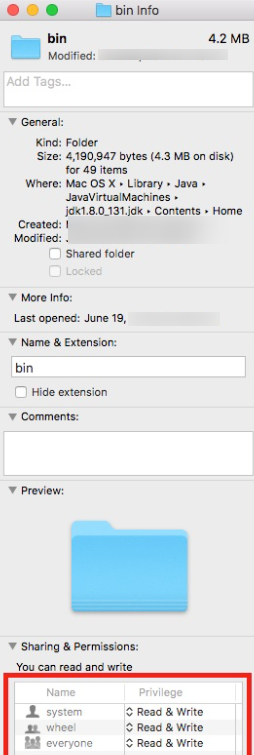
Step 7: After successfully authenticating, you can modify the permissions for the bin folder. Ensure that you have both read and write access to the folder.
Now, we will move on to the MAC OS X JarSigning process using the terminal:
Steps for MAC OS X JarSigning:
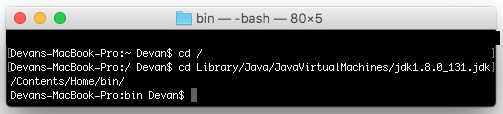
Step 1: Launch the Terminal application on your MAC OS X system.
Step 2: Use the terminal to navigate to the bin directory of the JDK installation. This stage is where you can find the jarsigner.exe, keytool.exe, and the eToken.cfg file you previously created.
Step 3: Verify the certificate handle by executing the following command in the terminal:
keytool -list -keystore NONE -storetype PKCS11 -providerclass sun.security.pkcs11.SunPKCS11 -providerArg eToken.cfg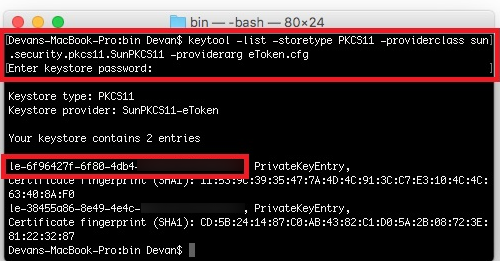
Step 4: When prompted, enter your keystore passphrase (or the token password) to proceed with the command execution.
In this way, install the 32-bit JDK. Create the necessary files and configure the permissions required for MAC OS X JarSigning.
JAR File Signing and Verification in MAC OS X
Follow the steps below to perform JAR file signing and verification in MAC OS X environments.
This guide will help you sign and verify JAR files securely without encountering any issues:
Step 1: Open the Terminal application on your MAC OS X system.
Step 2: To sign the JAR file, execute the following command in the Terminal:
jarsigner -tsa http://timestamp.digicert.com -keystore c:\path\to\your\keystore.jks -storepass YourPassword c:\path\to\your\file.jar YourAlias Note: Replace YourPassword and Your Alias
Step 3: To verify the signature of the JAR file, use the following command in the Terminal:
jarsigner -verify -verbose /directory/test.jarReplace “/directory/test.jar” with the path to your JAR file. Running this command will provide you with a detailed output, and at the end, you should see “jar verified,” indicating a successful verification.
These steps will allow you to confidently sign and verify JAR files in MAC OS X environments.

Apple/iOS Code Signing
Digitally Sign your iOS / Mac Application with Reputed Apple Code Signing Certificate and Prevent Tampering.
Buy Apple Code Signing Certificate
