How to Use YubiKey as Smart Card on MacOS?
Welcome to our comprehensive guide on using your YubiKey as a smart card in macOS! We all know that data breaches and online threats are a daily concern. It’s vital to fortify the security of our digital lives.
Thankfully, YubiKey—a compact, powerful hardware authentication device offers an ingenious solution.
While most of us are familiar with YubiKey’s role in two-factor authentication, did you know it can also function as a smart card for macOS?
By leveraging this feature, you can elevate the security of your Mac ecosystem to new heights. Join us as we delve into the world of YubiKey and unveil the steps to unlock its Smart Card capabilities in macOS.
List of Compatibility Devices
| SERIES/ VERSIONS | DEVICES | COMPATIBLE | INCOMPATIBLE |
| YubiKey 5 FIPS Series | YubiKey 5C NFC FIPS | Yes | |
| YubiKey 5 NFC FIPS | Yes | ||
| YubiKey 5Ci FIPS | Yes | ||
| YubiKey 5C FIPS | Yes | ||
| YubiKey 5 Nano FIPS | Yes | ||
| YubiKey 5C Nano FIPS | Yes | ||
| YubiKey Bio Series | YubiKey Bio – FIDO Edition | Yes | |
| YubiKey C Bio – FIDO Edition | Yes | ||
| Security Key Series | Security Key NFC – Enterprise Edition | Yes | |
| FIDO U2F Security Key | Yes | ||
| Security Key C NFC – Enterprise Edition | Yes | ||
| Security Key C NFC | Yes | ||
| Security Key by Yubico | Yes | ||
| Security Key NFC | Yes | ||
| YubiKey 5 Series | YubiKey 5 NFC | Yes | |
| YubiKey 5 Nano | Yes | ||
| YubiKey 5C Nano | Yes | ||
| YubiKey 5C NFC | Yes | ||
| YubiKey 5Ci | Yes | ||
| YubiKey 5C | Yes | ||
| YubiKey FIPS (4 Series) | YubiKey C Nano FIPS (4 Series) | Yes | |
| YubiKey FIPS (4 Series) | Yes | ||
| YubiKey Nano FIPS (4 Series) | Yes | ||
| YubiKey C FIPS (4 Series) | Yes | ||
| YubiHSM Series | YubiHSM 1 | Yes | |
| YubiHSM 2 | Yes | ||
| YubiKey 4 Series | YubiKey 4 | Yes | |
| YubiKey 4C Nano | Yes | ||
| YubiKey 4 Nano | Yes | ||
| YubiKey 4C | Yes | ||
| Legacy Devices | YubiKey Edge-n | Yes | |
| YubiKey Edge | Yes | ||
| YubiKey NEO | Yes | ||
| YubiKey NEO-n | Yes | ||
| YubiKey Nano | Yes | ||
| YubiKey Standard | Yes |
Prerequisites
Before beginning, there are a few requirements you need to meet:
- First and foremost, ensure that your macOS version is High Sierra (10.13) or the latest. Necessary to take advantage of the smart card functionality. Additionally, you’ll need an admin account on your Mac to make the required system-level changes.
- You will also need to install the YubiKey Manager to manage and configure YubiKey’s features, including its smart card functionality. By leveraging the YubiKey Manager, you can fine-tune your smart card settings and tailor them to your security needs.
- With the correct macOS version, an admin account, and the YubiKey Manager in place, you’re ready to use your YubiKey as a smart card in macOS.
In the upcoming sections, we will guide you in using YubiKey for MacOs Smart Card.
How to Customize Your YubiKey PIV Application?
We have mentioned the default settings of YubiKey PIV below:
- PIN: 123456 (Allowed characters: 6-8 digits; macOS requires numeric-only)
- PUK: 12345678 (Allowed characters: 6-8 digits)
- Management Key: 010203040506070801020304050607080102030405060708
If you are in a situation where you’ve forgotten your PIN and need to reset the PIV application to its default settings, you can always do that. But for now, let’s focus on personalizing your YubiKey PIV application by setting a new PIN and PUK.
Instructions for Establishing a Newer PIN:
First, follow these steps:
Step 1: Launch the YubiKey Manager on your computer.
Step 2: Click “Applications” and select “PIV“
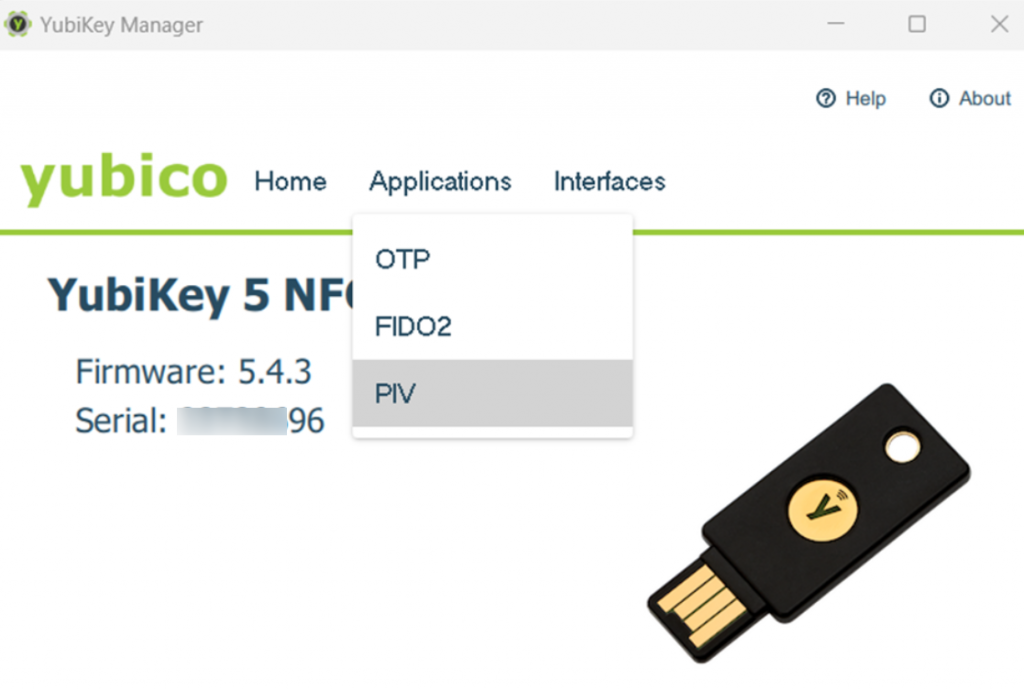
Step 3: Within the PIV application, locate and click on “Configure PINs“

Step 4: To set a new PIN, click on “Change PIN“
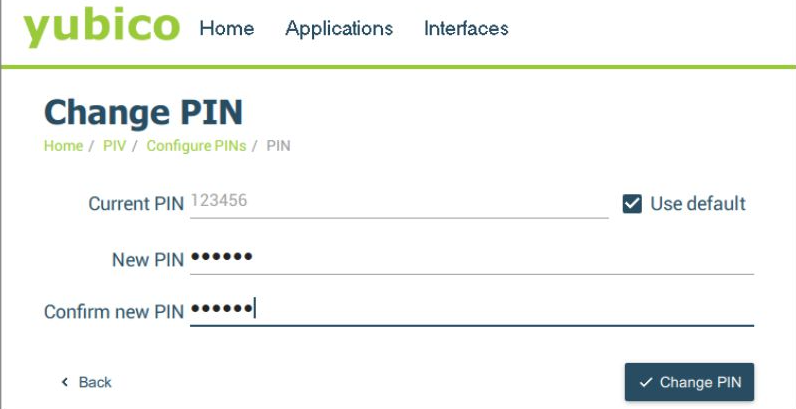
If you haven’t changed the default PIN, enter “123456” as the current PIN, or click “Use default” if applicable.
Choose a new 6-8 digit number for your PIN. Remember to use only numeric characters as macOS does not accept non-numeric characters for PINs used in login.
Confirm the new PIN by entering it again in the “Confirm new PIN” field.
Step 5: Once everything is set, click on “Change PIN” to save your new PIN.
Steps to Set a Changed PUK
Now, we will proceed to set a new PUK:
Step 1: On the “Configure PINs” screen, locate and click on “Change PUK“
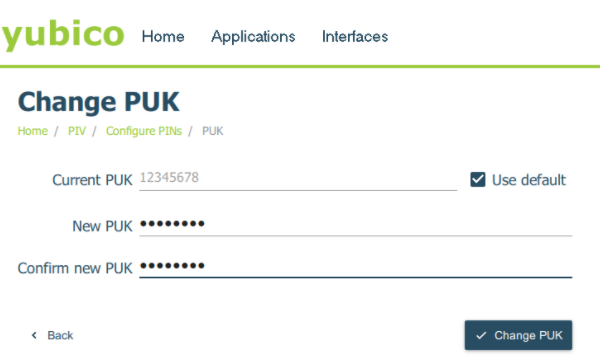
If you haven’t modified the default PUK yet, enter “12345678” as the current PUK, or click on “Use default” if applicable.
Choose a new 6-8 digit number for your PUK. Make sure to note it down for future reference.
Confirm the new PUK by entering it again in the “Confirm new PUK” field.
Step 2: Once double-checked all the information, click “Change PUK” to save your new PUK.
Congratulations! You’ve successfully personalized your YubiKey PIV application by now setting a new PIN and PUK.
Let’s continue personalizing your YubiKey by setting a new Management Key and configuring it for macOS account login.
How to Set up a Management Key Again?
For setting a New Management Key, follow the steps below.
Step 1: On the “Configure PINs” screen, locate and click on “Change Management Key“
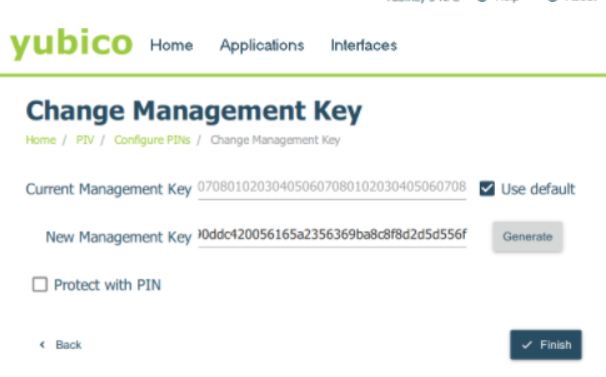
If you haven’t modified the default Management Key yet, enter “010203040506070801020304050607080102030405060708” as the current Management Key, or click on “Use default” if applicable.
Enter a new 48-character Management Key or select “Generate” to create a randomized one.
For added security, select the option “Protect with PIN” to encrypt the Management Key using your PIN. It means that instead of entering the 48-character Management Key, you can provide your PIN in the future.
This option is highly recommended, especially when configuring your YubiKey for macOS account login.
Step 2: Click “Finish” If you chose “Protect with PIN,” enter your PIN in the PIN field and click “OK.”
How to Set up your YubiKey to log into your MacOS Account?
Step 1: Launch the YubiKey Manager and click on “Applications” followed by “PIV.”
Step 2: Select “Setup for macOS“
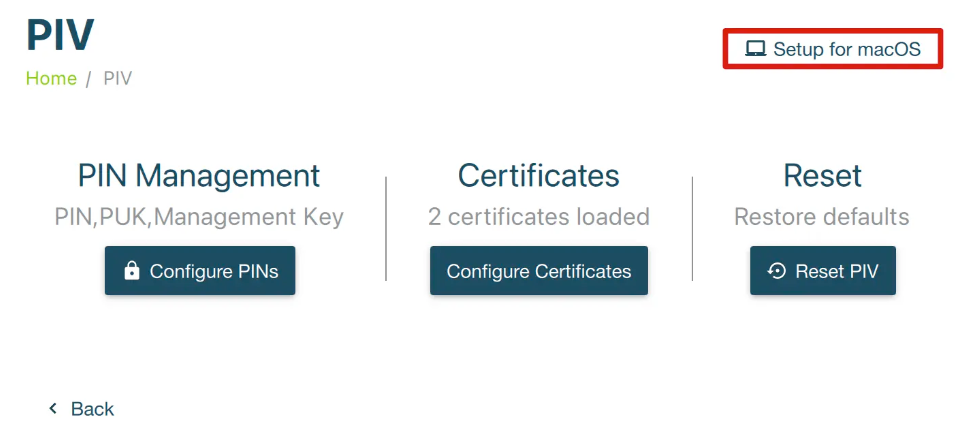
Step 3: Click “Setup for macOS” once again. If you selected “Protect with PIN” when setting the Management Key, enter your PIN when prompted.
If you set a custom Management Key without PIN protection, enter the Management Key in the prompt.
Step 4: Click “OK“
Step 5: Remove your YubiKey from the USB port and plug it back in.
Step 6: In the SmartCard Pairing macOS prompt, click “Pair” Note: If this prompt doesn’t appear, refer to the Troubleshooting and Additional Topics section.
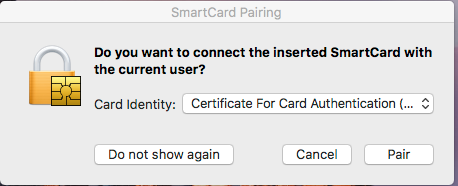
Step 7: Enter the password for the user account listed in the User Name field when prompted, then click “Pair.”
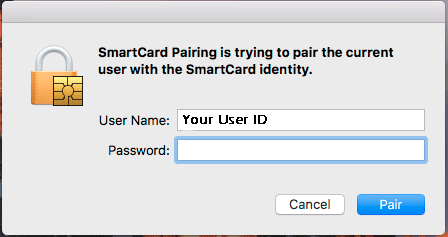
Step 8: In the SmartCard Pairing prompt, enter your YubiKey PIN (refer to the “Setting a new PIN” section above) and click “OK.”
Step 9: In the “login” keychain prompt, enter your keychain password (typically the password for the logged-in user account) and click “OK.”
Step 10: To test the configuration, lock your Mac by pressing Ctrl+Command+Q, and check if the password field displays “PIN” when your YubiKey is inserted.
QUICK NOTE: Try to unlock your session by entering your YubiKey PIN.
How to Remove the YubiKey and PIV Login Pairing from macOS?
QUICK NOTE: When unpairing your YubiKey from macOS, it is essential to note that this action does not disable the smart card requirement.
If you have previously enabled this requirement, it is crucial to disable it before proceeding with unpairing your YubiKeys. This precaution will help prevent any potential lockouts.
You can remove the profile responsible for enabling the smart card requirement by navigating to System Preferences > Profiles (please note that Profiles will only be visible if you have a profile installed).
For detailed instructions, refer to the Apple article, specifically the section “Disable Smart Card-only Authentication” You may disregard this warning if you cannot enable the smart card requirement.
To unpair your PIV login from macOS, follow the step-by-step procedures outlined below. You have the option to delete all certificates that were installed on your YubiKey when it was paired with macOS or selectively delete only the certificates associated with logging into macOS.
Additionally, we have included instructions for resetting macOS, preventing further prompts from pairing your YubiKey or any other smart card when detected by the system.
How to Remove Your Certificate from the YubiKey Hardware?
If you wish to delete all certificates on your YubiKey and reset the PIV application to default values, follow these steps:
Step 1: Open the YubiKey Manager and navigate to “Applications” followed by “PIV“
Step 2: Click “Reset PIV” and Confirm the certificate deletion by clicking “Yes.”
This procedure will remove all certificates and reset the PIN, PUK, and Management Key to their default values. If you want to keep your certificates, skip to the following procedure.
Use the procedures below to remove just the certificates generated following the completion of the macOS login instructions:
Step 1: Open the YubiKey Manager and go to “Applications” and “PIV“
Step 2: Click on “Configure Certificates“
Step 3: On the Authentication tab, click “Delete“
Step 4: Confirm the certificate deletion by clicking “Yes” If prompted for the PIN, enter it and click “OK” If prompted for the Management Key, provide it and click “OK“
Step 5: On the Key Management tab, click “Delete“
Step 6: Confirm the certificate deletion by clicking “Yes“
Step 7: If prompted for the PIN, enter it and click “OK” If prompted for the Management Key, provide it and click “OK“
Removing Smart Card Pairing via MacOS:
To remove a single YubiKey or smart card from the macOS login, follow these steps:
Step 1: Open Terminal to Run the command:
sc_auth list [username] (e.g., sc_auth list joy)Step 2: Highlight and copy (Command+C) the hash listed for your user.
If multiple YubiKey smart cards are paired with your account, and you need help determining which hash corresponds to which YubiKey, you can check the hash of a particular YubiKey by running sc_auth identities with the key plugged in.
Step 3: Run the command:
sc_auth unpair -h [hash]Removing every paired YubiKeys & smart card (for a single user), following this step:
Open Terminal and Run the command:
sc_auth unpair -u [username]Removing every paired YubiKeys & Smart Card for the Presently Logged-in User using this step:
Open Terminal to run the command:
sc_auth unpair -u $(whoami)For turning off your Pairing User Interface in the MacOS, use the following step:
Open Terminal and run the command:
sc_auth pairing_ui -s disableQUICK NOTE: The pairing user interface can be re-enabled using the command sc_auth pairing_ui -s enable.
Enabling Smart Card Requirement with Your YubiKey:
QUICK NOTE (for Apple Silicon Users):
It’s essential to know the differences in smart card authentication between Macs with Apple Silicon CPUs and those with Intel processors. Requiring a smart card for macOS login on Apple Silicon Macs can lead to a system lockout if not done correctly.
Additionally, when smart cards are required for login on Apple Silicon Macs, they must also be used to unlock FileVault. When the computer is shut down, macOS associates the last used a smart card with FileVault disk encryption.
Consequently, only the most recently used smart card will work to unlock the disk upon the next startup, rendering any backup smart cards unable to unlock the disk.
This solution is primarily designed for corporate enterprises that have implemented a centrally managed Certificate Authority (CA) for certificate lifecycle management, along with an endpoint management system that offers an account recovery process for locked-out users.
CAUTION: Requiring smart card authentication can potentially result in a system lockout if not performed correctly. Yubico holds no responsibility for any system lockouts that may occur due to enabling smart cards on your Mac.
Before making any configuration changes, please follow these guidelines:
- Read the following two Apple articles, paying particular attention to the disabling smart card-only authentication section in the first link:
- Register at least two smart cards and verify that both function properly for authentication (logging in and unlocking your account). Also, refer to the specific considerations mentioned in the “FileVault Configuration in the Apple Silicon-based Macs” section. You can find it in the second article about Apple Silicon Macs.
By default, a paired smart card can be an alternative login method, but it is not mandatory. Please exercise caution and ensure that you follow the guidelines to avoid potential issues and ensure a smooth implementation of smart card authentication with your YubiKey on macOS.
FileVault Configuration for Intel-based and Apple Silicon-based Macs
FileVault is a powerful full-disk encryption solution provided by macOS.
For Intel-based Macs:
QUICK NOTE: For Intel-based Macs, FileVault does not support using smart cards for pre-boot authentication. So, you will still need to enter your password to unlock your FileVault-encrypted disk. This initial password prompt occurs when you start your Mac from a powered-off state.
By default, when a user enters their password to decrypt the FileVault disk during boot, the password is used for authentication. Then, the smart card login is not utilized, even if configured as a requirement.
To change this behavior and ensure that the user is presented with a login screen for a second authentication prompt instead of automatic login, you can run the following command in the Terminal:
sudo defaults write /Library/Preferences/com.apple.loginwindow DisableFDEAutoLogin -bool YESFor Apple Silicon-based Macs:
Smart cards are now supported for pre-boot authentication with FileVault on Apple Silicon-based Macs. However, it’s important to note that only the most recently used smart card will work during this authentication phase.
So, any backup smart cards set up for this purpose will not be able to unlock the disk.
Consequently, this functionality is primarily intended for corporate enterprises with a centrally managed Certificate Authority (CA) for certificate lifecycle management and an endpoint management system offering an account recovery process for locked-out users.
Consumers and individuals must understand that enabling smart card authentication for macOS login can potentially lead to a system lockout if not performed correctly.
Before making any changes to your FileVault settings, kindly ensure that you understand the implications of these configurations. They will be based on your Mac’s (Intel- or Apple Silicon-based) architecture.
Using Multiple YubiKeys with macOS:
Use the Same YubiKey Smart Card on Multiple Macs for Logging in:
Once you have successfully set up your YubiKey on the first Mac, you can also easily use it on other Macs. Plug your YubiKey into the additional Macs and follow steps 6-9 in the “Pairing your YubiKey with macOS” section to complete the pairing process.
Using the same YubiKey smart card for multiple accounts on a single Mac:
QUICK NOTE: MacOS allows you to associate a specific YubiKey with only one user account on a single Mac. If you intend to use multiple YubiKeys with different accounts on the same Mac, you must follow the steps outlined in this guide separately for each YubiKey.
This process ensures that each YubiKey is correctly set up and associated with its respective user account. When using multiple YubiKeys, remember that the PIN required for authentication may vary depending on your setup.
Troubleshooting Guide
Occasionally, you may encounter issues where the smart card pairing prompt does not appear, as in step 6 of the “Configuring your YubiKey for macOS account login” section. If you face this situation, follow the steps below to troubleshoot the problem:
- Check if the Pairing UI in macOS is disabled. To enable it, open Terminal and run the following command: sc_auth pairing_ui -s enable.
You can verify the status of the Pairing UI by running the command: sc_auth pairing_ui -s status. Once enabled, reinsert your YubiKey and proceed.
- By enabling the Pairing UI that doesn’t resolve the issue, try reinserting your YubiKey a few more times. Sometimes, this can trigger the pairing prompt to appear.
- If the pairing prompt still does not appear, with your YubiKey inserted, open Terminal and run the command: sc_auth pairing_ui -f.
- If the above command doesn’t produce any results, continue with the YubiKey inserted and run the command: sc_auth identities in Terminal.
- This command will check if your Mac detects any unpaired smart cards. The output of the command should resemble the following:
| Hashed Card | Unhashed Card ID |
| <hash> | A205691C39CBE2FF81F72070C8FEE6B27DF4E527 |
In case you see this output, you can manually initiate the pairing process for your smart card. You can use the following Terminal command, replacing ‘<hash>’ with the long string from the sc_auth identities output (e.g., A205691C39CBE2FF81F72070C8FEE6B27DF4E527 in the example above): sudo sc_auth pair -h <hash> -u $(whoami).
- If the sc_auth identities command doesn’t yield any output, resetting the PIV smart card application on your YubiKey is advisable. Follow the steps in this article from the beginning to ensure a proper configuration.
These troubleshooting steps should resolve any issues related to the smart card pairing prompt and successfully configure your YubiKey for macOS account login.
Instructions for Lost or Stolen YubiKey:
If you require a paired smart card for login and your YubiKey is lost or stolen, it is vital to take appropriate action. Please refer to the steps in the same article under the “Disable smart card-only authentication” section to disable the smart card requirement and prevent unauthorized access to your Mac.
However, if you still need to configure your Mac to require a smart card for login, the YubiKey is optional for accessing your account. In such cases, you can still log in to your Mac by entering your regular account password. It’s important to note that following the steps in this guide will keep your regular account password the same.
To unpair a lost or stolen YubiKey from your Mac, please follow the instructions provided in the section above titled “How to Unpair Your YubiKey and PIV Login from macOS.” This will ensure that the lost or stolen YubiKey is no longer associated with your Mac’s login credentials.
We hope you now have all the knowledge to safeguard your digital world effectively.

