
How to Setup Your EV Code Signing Certificate [An Easy Guide]
Last Modified: September 13, 2024
The collection process of an EV Code Signing certificate is quite different compared to the OV (Organization Validated) Code Signing certificate. But it also offers additional security practices that aren’t provided by a standard code signing certificate.
Nonetheless, here in this piece of article, we’ll discuss how to setup your EV Code Signing certificate so you can move further with digitally signing your applications and software.
General Overview
Once you complete an enrollment process and pay for your EV (Extended Validated) Code Signing certificate, the CA (Certificate Authority) like Certera, Comodo, Sectigo and DigiCert will start with their vetting process.
In the vetting process, CA verifies the legitimacy of your company according to the defined guidelines of an EV Code Signing certificate by CA/B Forum.
Similarly, the vetting process of EV Code Signing certificate is like a regular code signing certificate. Still, certain extra steps need to be completed that aren’t with a regular code signing certificate.
You can also go through the article written on validation requirements to get an EV Code Signing certificate to know more about it.
And, once validation of your applied EV Code Signing certificate completes, you’ll receive a digital signing certificate along with a private key through courier to the registered business address that you provided at the time of applying for an EV Code Signing certificate.
Extended Validation Code Signing Certificate is indeed sent physically using courier services such as UPS or FedEx. But, it’s because of the extra security feature that comes with an EV Code Signing certificate.
Here, with EV Code Signing, private keys are stored separately on an HSM device that works as two-factor authentication to provide maximum security.
What’s Within the Received Package of an EV Code Signing Certificate?
According to your chosen Certificate Authority, the package differs, but you’ll find two things within that received package for sure:
- Letter by Certificate Authority.
- USB token that contains the Private Key of your EV Code Signing certificate.
Installation of Safenet Authentication Client
For the installation process of the Safenet Authentication Client, it’s recommended that you go through the CAs (Certificate Authorities) who received the letter that includes the URL for accessing and installing the required Safenet Authentication software.
Similarly, download the latest Safenet Authentication for your computer system that you would like to use for code signing your software and applications with an EV Code Signing certificate.

And, once you complete the installation of Safenet Authentication, it’s best if you restart your computer system to make sure it’s installed successfully.

How to Setup Your Issued EV Code Signing Certificate to Sign Software?
Go through the below steps to setup your received EV Code Signing certificate, so you can start using it for digitally signing your software and applications:
Plugin Received HSM Device to USB Port
First, open your recently installed Safenet Authentication software and then the HSM device you received through mail from the CA to the USB port.

Change Default Password
If you want to use the default password provided by the Certificate Authority, you can use it, but it’s recommended that you change your password and set another stronger one. For example, click on the option “Chang Token Password,” and it’ll open the interface through which you’ll be able to change your token’s password.

Furthermore, check the email you received through Certificate Authority and from that copy the received password and enter the “Current Token Password” text field and then enter your new password twice in text-field “New Token Password” and “Confirm Password,” respectively. Lastly, click the OK button.
Collect Your Certificates
To move ahead with the collection of your certificate that you can use to sign software and application digitally, click on the gear option from the above:

Once you click on the Gear option, it’ll change the entire interface like below and show a left sidebar with available tokens and drop-downs. Nonetheless, click on that drop-down menu till you reach the specific certificate of your company, as shown in the below example:
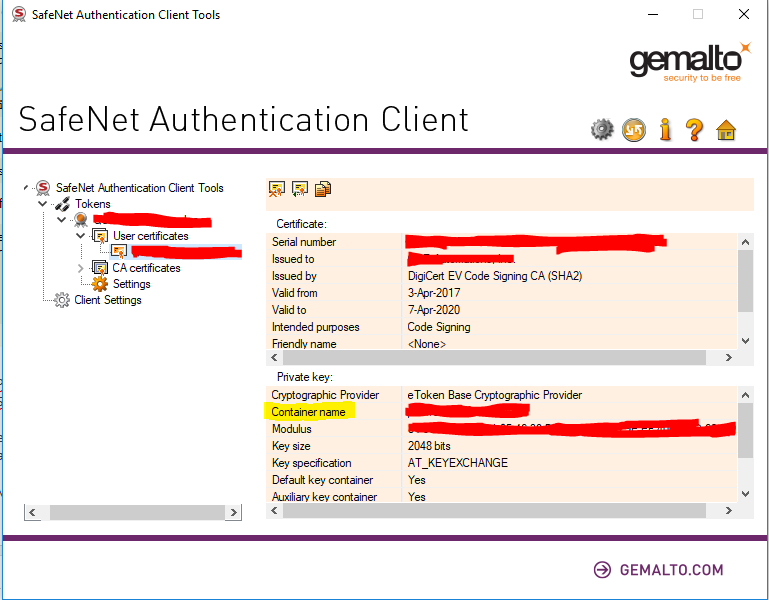
Lastly, once you collect your certificate, you’ll be able to sign your application using your EV Code Signing certificate.
Summary
EV Code Signing certificate is quite different compared to standard code signing certificate. Therefore, it’s required to follow certain steps before you can start digitally signing your software.
Similarly, here we’ve discussed some of the steps you’ll need to follow so you can use your received EV Code Signing certificate to sign software and application digitally. We hope it may prove beneficial. Good luck!
Best EV Code Signing Certificates to Get!
| Products | Price | URL |
| Certera EV Code Signing Certificate | $279.99/yr | Buy Now |
| Comodo EV Code Signing Certificate | $279.99/yr | Buy Now |
| Sectigo EV Code Signing Certificate | $279.99/yr | Buy Now |
| DigiCert EV Code Signing Certificate | $559.99/yr | Buy Now |

EV Code Signing Certificate
Digitally Sign your Windows 10+ Drivers, Kernel Mode Drivers, Packages with Highest Level Security and Assurance of EV Code Signing.
Price Starts at $279.99 Per Year
