
How to Code Sign iOS Apps on Apple Developer Program?
All iOS applications must be digitally signed before being installed on real devices or published to the App Store. This is a security measure implemented by Apple to verify the developer’s identity and ensure that the app has not been subjected to any kind of modification in any way.
Code signing iOS apps is a necessary process that ensures the authenticity and integrity of the app and is a requirement for distributing the app through the App Store.
iOS Code Signing Certificate
Digitally Sign your Mac OS and iOS-based Applications, Plugins, and Code for Mac OS X Desktop.
Code signing iOS apps is a process that involves obtaining a code signing certificate from Apple, developing an App ID and then a provisioning profile, and then using Xcode to sign the app.
This process is necessary to ensure the authenticity and integrity of the app and that it can be tested and distributed through the App Store.
A few things are needed for code signing an iOS app. Let’s find out what they are.
What is Needed for Code Signing iOS Apps?
These are some of the things that are needed for code-signing iOS apps.
Code Signing Certificate:
This digital certificate is used to sign the app. It can be obtained from Apple by enrolling in the Apple Developer Program and creating a certificate signing request (CSR) in the developer portal. You can do this using the Keychain Access application on your Mac.
An App ID:
This unique identifier identifies and associates your app with your code signing certificate. It can be created in the developer portal.
A Provisioning Profile:
This collection of digital assets is required to sign, test, and distribute your app. It can be created in the developer portal and associated with your App ID and code signing certificate.
Xcode:
This is a development tool that is used to sign the app. It can be downloaded from the Mac App Store.
Mac:
A mac is required to sign the iOS app because the signing process requires a macOS and Xcode.
A Developer Account:
A developer account is required to access the developer portal and download the necessary code-signing assets.
Remember that you need to renew the provisioning profile and the developer certificate at least once a year. In app development for a client, you should provide them with the appropriate code-signing assets and instructions on using them.
Here’s a detailed guide on how to code sign iOS apps.
What are the Steps to Code Sign iOS Apps?
These are the steps to create Code Sign iOS apps.
Step 1: Obtain a Code Signing Certificate
- After registering with the Apple Developer Program, access to the developer portal will be given, where you can manage your code signing certificates.
- Once you have enrolled, you will need to create a certificate signing request (CSR) file.
To generate a CSR in an iOS app, use of Keychain Access application on a Mac computer must be done Here are the general steps to generate a CSR:
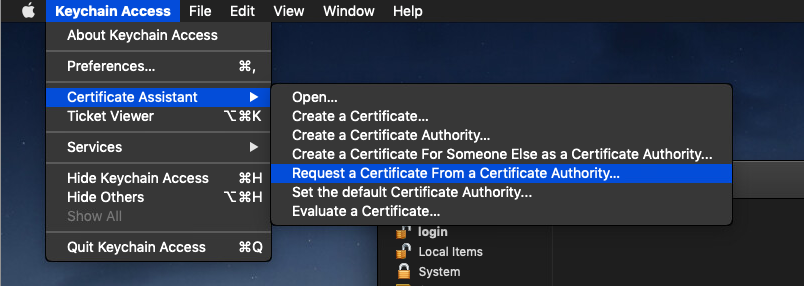
Open the Keychain Access application on your Mac.
- In the top menu, select ‘Keychain Access’ > ‘Certificate Assistant‘ > ‘Request a Certificate from a Certificate Authority.’
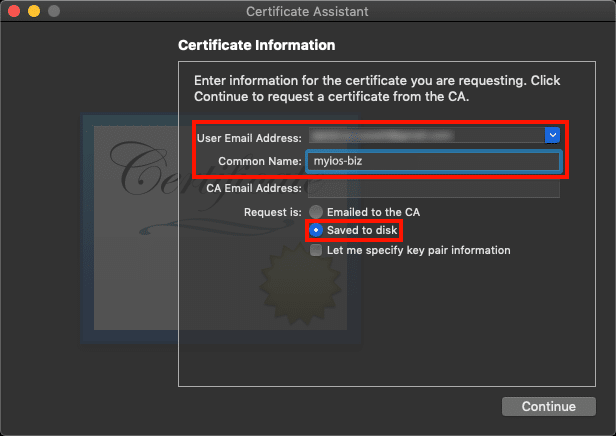
- In the ‘User Email Address‘ field, enter the email address associated with your Apple developer account.
- In the ‘Common Name‘ field, enter a name for your app.
- In the ‘Request is‘ group, select ‘Saved to disk.’
- Click on ‘Continue‘ and then specify a location to save the CSR file on your computer.
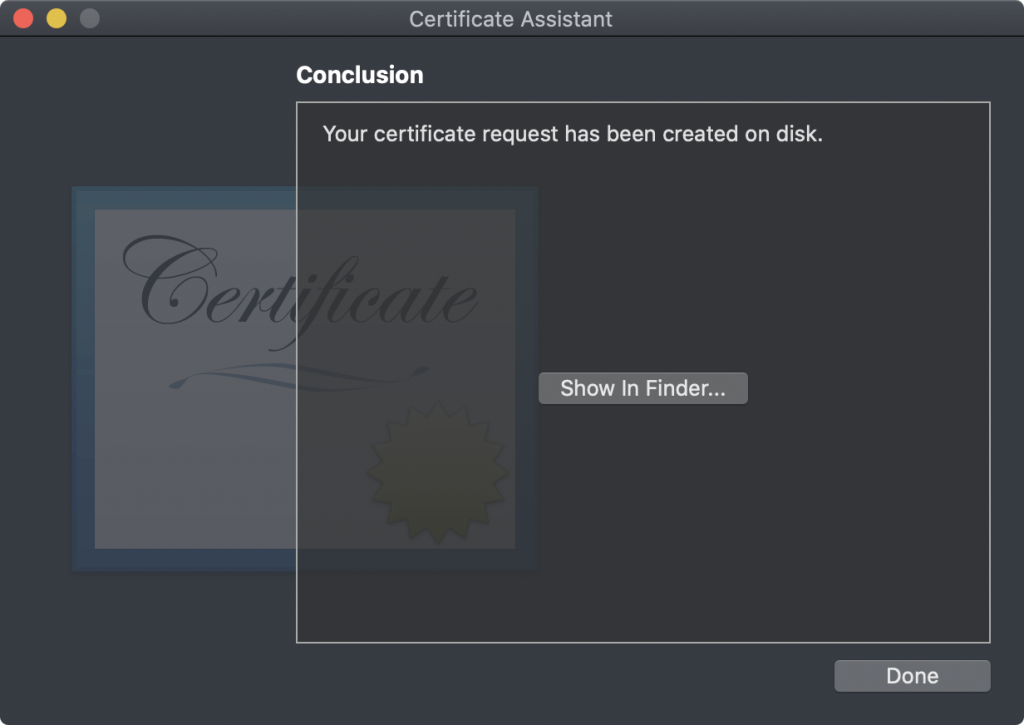
- Once the CSR is generated, it will be saved as a .certSigningRequest file.
- Submit the CSR to the Apple Developer portal, where you can request a code signing certificate.
After you’ve requested a certificate, Apple will verify your identity and application details; if approved, you will receive the certificate you can use to sign your application.
Always remember that the generation of CSR may vary depending on the version of Xcode and Keychain Access you are using, and you should refer to the official documentation for the most up-to-date instructions.
- The next step is to log in to the developer portal and navigate to the Certificates, Identifiers & Profiles section.
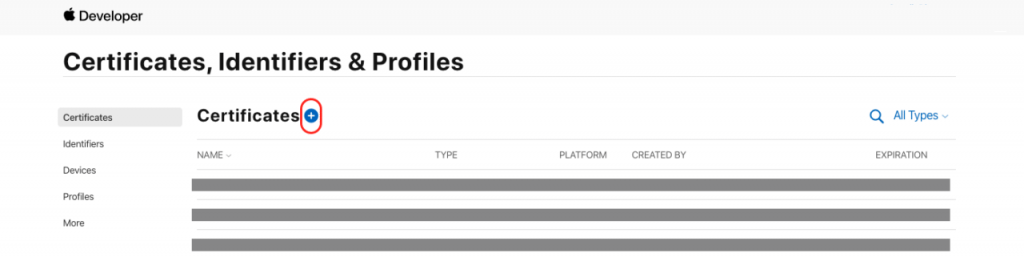
- In the Certificates section, click the plus button to create a new certificate.
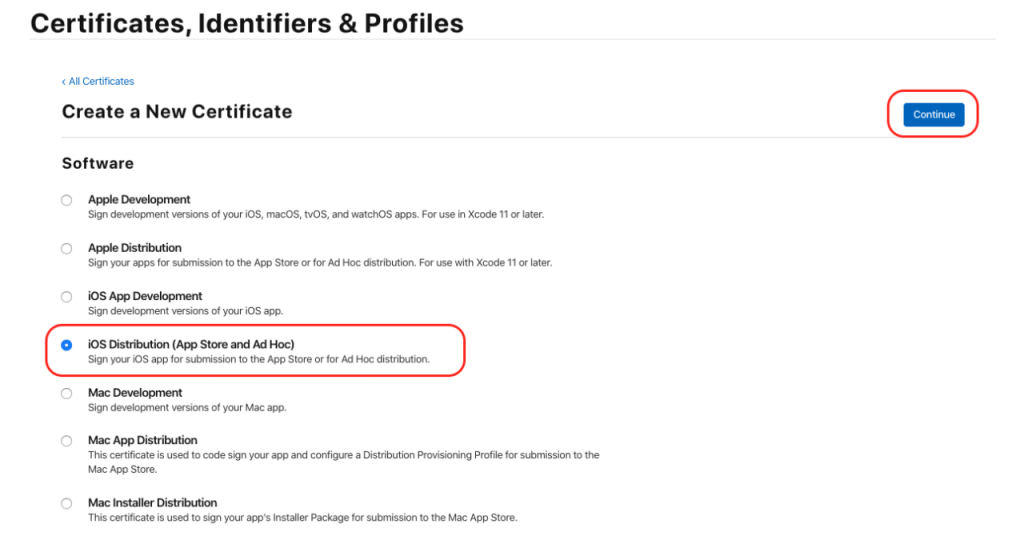
- Click on the App Store and Ad Hoc option and then click Continue.
- You must follow the instructions to upload your CSR file and generate your code signing certificate.
Step 2: Create an App ID
Creating an App ID is essential in developing and deploying an iOS app.
Here is how you can make an App ID for your iOS app code sign:
- Log in to the Apple Developer portal (developer.apple.com) with your Apple ID.
- Navigate to the ‘Certificates, Identifiers & Profiles‘ section.
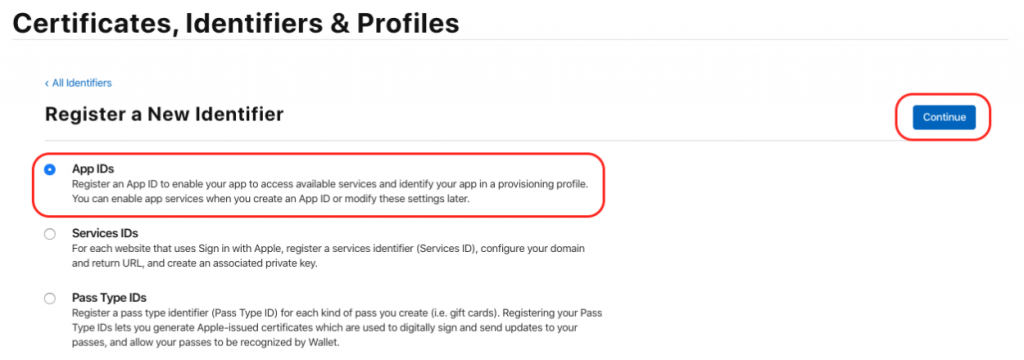
- Select ‘App IDs’ under the ‘Identifiers’ section.
- Select the plus (+) button to create a new App ID.
- Fill in the ‘Description‘ field with a name for your app.
- In the ‘Bundle ID’ field, a unique identifier for your app must be specified. This should be in reverse-DNS format, such as ‘com.example.myapp‘.
- Select the services you want to enable for your app, such as In-App Purchases or push notifications.
- Click on ‘Continue‘ and then ‘Register’ to create the App ID.
- Once the App ID is created, it will appear in the App ID list in the Apple Developer portal.
It’s important to note that the Bundle ID you specify must match your app’s Bundle Identifier in Xcode. If you are developing a distribution version of your app, you must create a distribution certificate and provisioning profile that match the App ID you created.
You can use the App ID to sign your app, and it will be used to identify your app when it is submitted to the App Store or deployed to devices.
Step 3: Create a Provisioning Profile
A provisioning profile file code signs an iOS app and specifies the app’s capabilities and permissions.
Here is the process of creating a provisioning profile for your iOS app code signing:
- Log in to the Apple Developer portal (developer.apple.com) with your Apple ID.
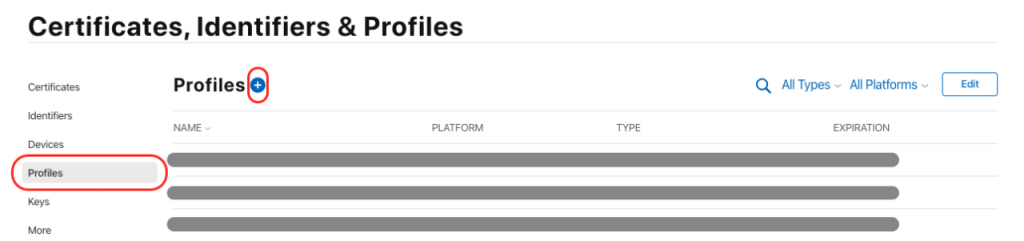
- Navigate to the ‘Certificates, Identifiers & Profiles‘ section.
- Under the ‘Provisioning Profiles‘ section, select ‘All.’
- Click on the ‘+‘ button to create a new provisioning profile.
- Select the provisioning profile type that needs to be created, such as ‘iOS App Development‘ or ‘iOS App Store.’
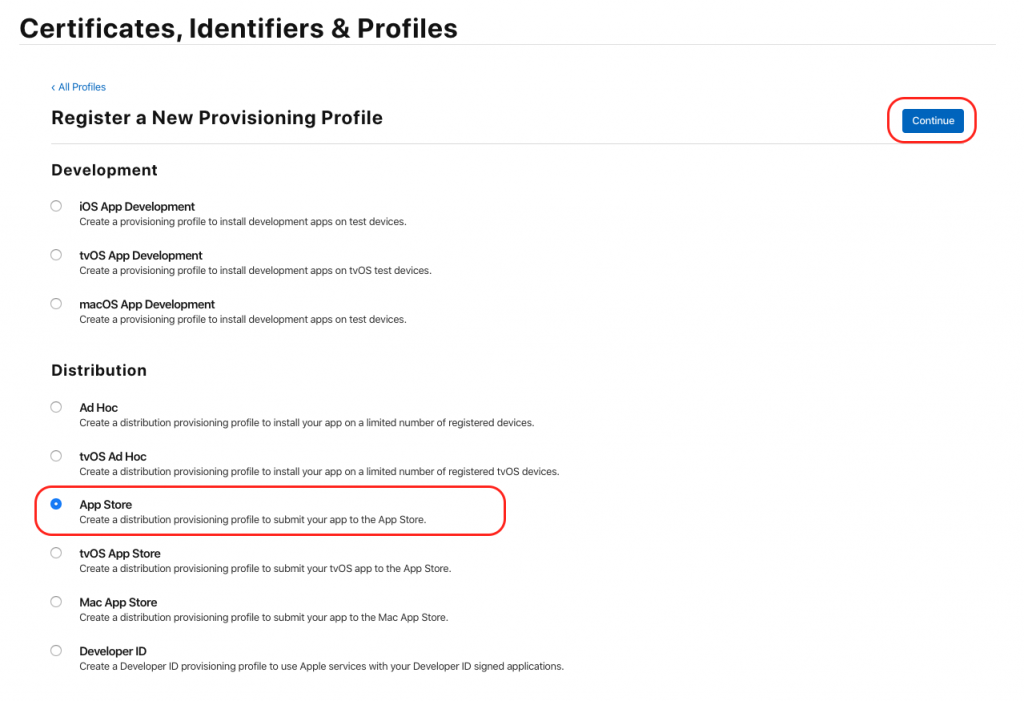
- Click on the App ID created earlier that matches your app.
- Select the certificate you want to use for code signing.
- Choose the devices you want to deploy the app to, or use an existing device group if you have one.
- Give the profile a name, and click on ‘Generate‘ to create the profile.
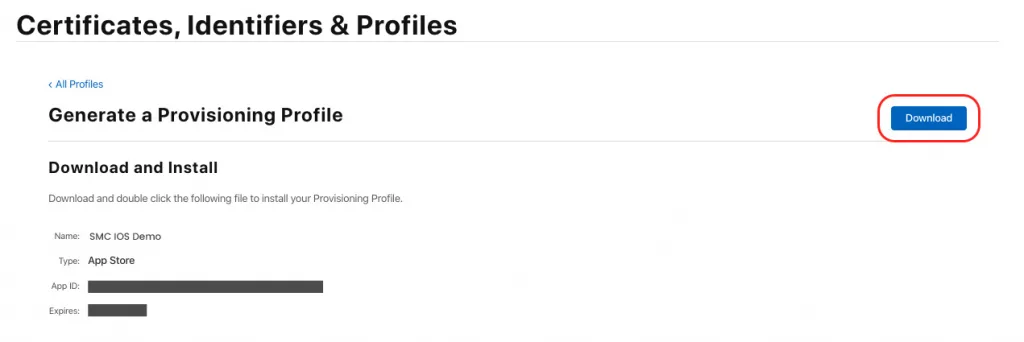
- Download the provisioning profile and add it to your Xcode project.
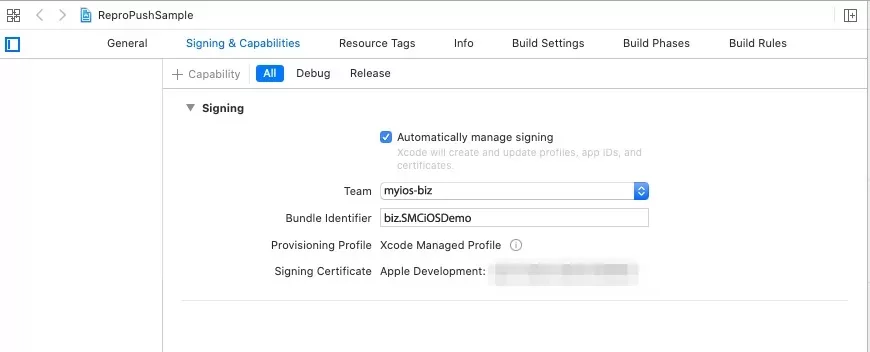
In Xcode, go to the project’s general settings, and under the ‘Signing & Capabilities’ section, select the freshly created provisioning profile for signing your app.
Note that one has to renew the provisioning profile every year, or it will expire, and you will need to create a new one. Also, you will need to create different provisioning profiles for different stages of development, such as development, testing, and production, but the steps to create a provisioning profile are similar in each stage.
Step 4: Sign your Application
- Open your project in Xcode.
- Go to the ‘General‘ tab and select your provisioning profile from the ‘Signing‘ section.
- Build your app and test it on a device using the provisioning profile.
Step 5: Test and Distribute your Application
- After signing your app can be tested on a device using the provisioning profile.
- Once the app is good to go, it can be submitted to the App Store and then distributed.
Always remember that you must renew the provisioning profile and the developer certificate at least once a year. In addition, if an app is being created for a client, you should provide them with the appropriate code signing assets and instructions on how to use them.
This process helps to ensure that all apps on the App Store are from a known and trusted source, which helps to protect users from malicious software and other security threats.
So, this is how iOS apps are code-signed. But do you know why code signing in iOS apps is essential? Let’s find out.
Reasons Why Code Signing in iOS Apps Important
Here are a few reasons why code signing iOS apps is essential:
Validation
By signing your code, Apple can validate that a registered developer developed the app and that the code has not been tampered with. This helps to prevent malicious code from being distributed through the App Store.
Security
A Code Signing Certificate helps to ensure that the app is secure and can only be run by authorized users. It ensures that the app has not been subjected to any modification or tampering in any way since the developer signed it.
Distribution
Only signed apps can be distributed through the App Store. This ensures the app is secure and a verified developer has developed it.
User Trust
When an app is signed, it provides the end user a level of trust and confidence that the app is legitimate and has not been tampered with. This can increase the number of downloads and improve user satisfaction.
Protection
Code signing helps to protect the developer’s intellectual property rights and assures that the app can only be run on authorized devices. This can help to prevent piracy and unauthorized distribution of the app.
So, signing your code for an iOS app is important!
Get Your iOS App Code-Signed!
Code signing is an important security feature for iOS and iPad apps. It ensures that the app has not been subjected to any modification or tampering since the developer signed it. We hope the above-mentioned steps help you code-sign the iOS app efficiently.

Apple/iOS Code Signing
Digitally Sign your iOS / Mac Application with Reputed Apple Code Signing Certificate and Prevent Tampering.
Buy Apple Code Signing Certificate
