
PowerShell Code Signing Best Practices for Signing Your Script
Last Modified: September 18, 2024
PowerShell is a powerful tool that is used for automating monotonous and time-consuming tasks. However, using these without code signing can leave you vulnerable to cyber-attacks.
This blog will explain the PowerShell code signing best practices for signing your script. Let’s begin!
Also Read: What is PowerShell? Things to know about PowerShell Code Signing.
PowerShell Code Signing Best Practices
Use The latest PowerShell Version
The first and foremost best code signing practice is to use the latest Powershell version. This is for every software you use, not only PowerShell.
How will you check if the latest version is installed on your device or not? So, there are different methods to identify this, as explained below.
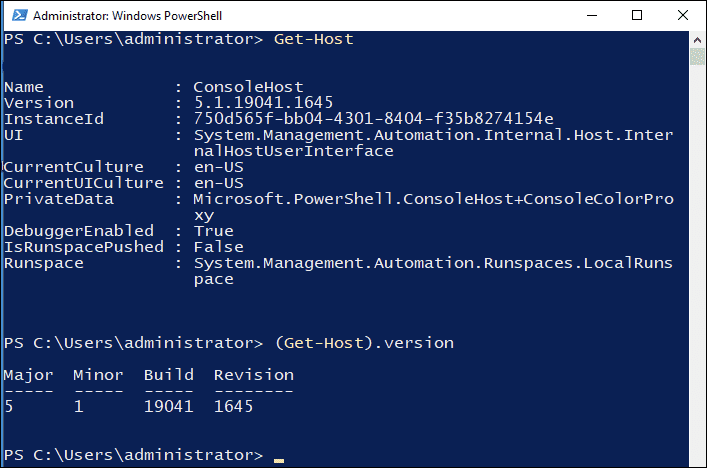
The Get-Host Command
When you run the Get-Host command in PowerShell, it tells you information about the program (or “host”) running PowerShell. This includes details like the program’s name, version, and some settings, like language preferences.
However, the version number you see from Get-Host doesn’t always tell you the exact version of PowerShell itself. Instead, it usually shows the version of the program that’s running PowerShell. That’s why sometimes the results are inaccurate.
The version mentioned below is 5.1.19041.1645
The $host.Version command
Run (Get-Host). Version and you will see the similar version as we have got above.
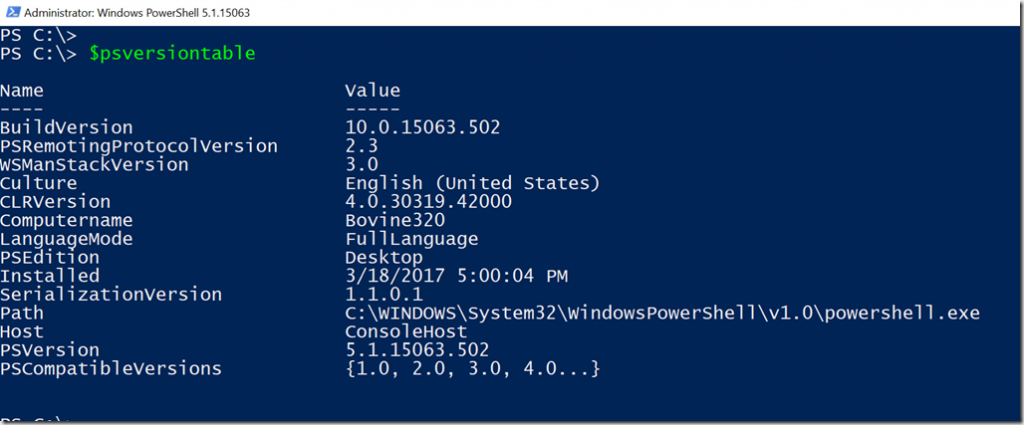
The $PSVersionTable command
This is one of the most reliable and trusted methods for identifying the PowerShell version.
All you need to do is type $PSVersionTable in the command prompt, press Enter, and you’ll see the below results.
Limit Access to the PowerShell Console
Powershell is a powerful tool for automating administrative tasks and managing systems in Windows. However, if the wrong entities get access to it, they can maliciously modify system settings, install malware, or even delete data.
To avoid such circumstances, it’s vital that only trusted authorities gain access to the PowerShell Console. To limit the access, use role-based access control (RBAC).
It is a built-in feature in PowerShell that allows respective owners to control who can run PowerShell commands. For instance, only the IT department can run PowerShell commands and not other teams.
Log Script Signing Actions
Logs and monitoring tools are used to address and prevent security incidents. Here’s how!
- Monitor Script Signing: Use Kibana, Grafana, or Tableau to identify suspicious and anomalous activities in minutes.
- Audit Log Key Usage: Maintain detailed logs of code signing key usage to track how and when certificates are used. Additionally, regularly audit them to proactively identify security threats and maintain control over the script signing process.
Implement Signing Keys Policies
Ensuring the security of private keys is not just enough; in fact, you have to develop and implement some strict measures. Below are some!
- Use a strong authentication method, like multi-factor authentication, to digitally sign a script.
- Regulate the access control and give access only to authorized users.
- Use Checksums to check whether the original script has been altered. It’s a unique value that comprises a short string of alphanumeric characters.
Avoid Signing all The Scripts With the Same Key
Using just one key to sing all the scripts is a good idea. Right? But no, it’s not that good!
Of course, it’s cheaper and easier to manage, but you will end up paying much more amount than spending only a few extra to get the extra keys.
What if you use the same key? Read on to find out!
An attack or breach on that respective key will invalidate other signatures and good code. The process works as the saying goes: one rotten egg can spoil the whole barrel.
You will be saved a bit if you have applied the timestamps while singing the scripts.
But why take the risk if you are already aware of that? So, choose wisely!
Use Hardware Security Module (HSM)
HSM, or Hardware Security Module, is a tamper-resistant and FIPS-validated device that protects, processes, and manages cryptographic keys. It allows the usage of keys without having direct access to them.
Recommended: How to Sign the PowerShell Script Code with YubiKey?
So, always ensure that all the private keys for the code signing certificate are saved on an HSM. Don’t forget to protect the cryptographic HSM with a randomly generated 16-character-long password.
Always Prefer a Trusted Code Signing Certificate
Always get a code signing certificate from a trusted CA, like Comodo, DigiCert, Certera or Sectigo, instead of a self-signed one.
A self-signed code signing certificate has an unconfirmed identity. This means that users will receive a warning message whenever you make it available publicly.
Recommended: Self-Signed vs. Publicly Trusted CA Code Signing Certificates: which one should you choose?
On the contrary, code signing certs issued by trusted CAs do not show any warning and get downloaded smoothly.
Avoid Running Unsigned Scripts
PowerShell is a potent tool, and if cybercriminals hack it, they can seamlessly access systems and data.
To mitigate the risk, PowerShell includes a security feature called “script signing”, which allows you to sign the script digitally. This process verifies the script’s authenticity and ensures it’s not tampered with.
Recommended: Buy PowerShell Code Signing Cert and Sign your Code – Starts at Just $215.99/yr
Still, you’ll run the unsigned script; a warning will be displayed. Make sure not to bypass and resolve it as soon as possible.
Scan For Viruses Before Signing
Ensure that the software is virus-free before it’s signed so you can handle the potential problems at the initial stage only.
Any breach after the code signing will affect the users’ computers or devices, and the signing certificate needs to be revoked. Getting a new one will be pretty much harder due to the validation requirements.
Timestamp Everything
Timestamping the digital signature ensures that users can still access it without any warning. It adds the exact time and date when the signature was applied.
To set the timestamp, add -TimeStampServer https://TIMESTAMP_SERVER at the end of the Set-AuthenticodeSignature command.
Make sure to replace C:\PS\powershell_script.ps1 with the script path and https://TIMESTAMP_SERVER with your CA (certificate authority). (e.g., https://timestamp.digicert.com)
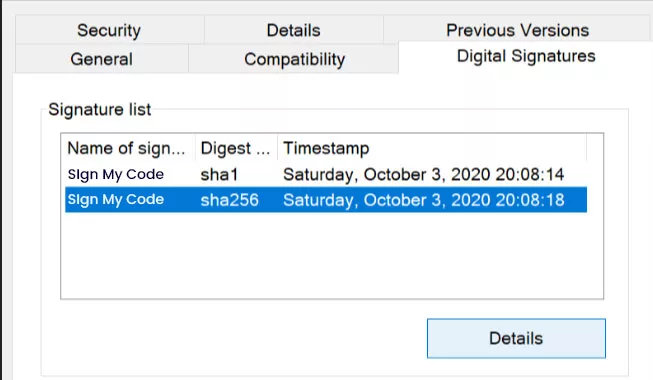
To check if timestamping was successful, follow the below steps.
- Right-click on the script’s folder to select “properties”.
- Click the Digital Signatures tab.
If the process is done successfully, you will see the below result.
We understand that these are extra steps to configure the signing device but trust us, these are necessary. Failure to do so will render the signatures invalid once the code signing certificate expires.
Now, it’s a fact that despite using protective measures, some mistakes can still happen; after all, we are all human beings.
Here are some tips on revocation if the code signing cert gets compromised.
- Immediately notify your CA when the issue arises.
- The revocation date affects the validity of timestamped signatures. Always select a date before the day the certificate was compromised.
The Bottom Line
To conclude, you can use the above code signing best practices to secure your scripts further and enjoy peace of mind that these are protected from hackers!
Recommended: How to Sign Digitally PowerShell Script With a Code Signing?
Buy Code Signing Certificate
Increase your Software Downloads and Verify its Integrity by Digitally Sign Software and Executables using Trusted Code Signing Certs.
Price Starts at $215.99 Per Year
