
How To Code Sign Windows Kernel Drivers using EV?
Windows is the most used operating system in personal and organizational aspects. And the kernel is its primary component, which needs complete security from malicious actors. To strengthen its protection, Microsoft has a policy that users doesn’t get permission to run non-signed kernel drivers.
It means if you develop any Windows Kernel Driver, you cannot release it without signing. So, it’s essential to understand the signing process with its development. And here, you will find a streamlined procedure to follow from the beginning to reach the releasing stage. So, let’s get started.
What is a Windows Kernel Driver?
The kernel is the core of the Windows operating system, which gets loaded instantly after the bootloader. And drivers are the programs that Kernel executes and helps to manage the input-output operations, security, memory, plug-and-play devices, and all other OS functions.
In addition, kernel drivers help to maintain data flow and compatibility with computer hardware.
Furthermore, the kernel driver is an essential component of the Windows operating system, that requires top-most security from malicious actors. If the kernel gets exploited, an attacker can avail administrator privileges and execute any illegitimate activity on your system.
The Need To Sign a Windows Kernel Driver
As the kernel is a crucial component, Windows allows only authentic kernel drivers to get installed. It aids in assure that the driver is malware-free and comes from an authorized publisher.
If you develop a kernel driver for your customers without signing it with an EV Code Signing Certificate, you can’t install it. And if you are an individual developer/publisher, you are not eligible for publishing a kernel driver file.
Furthermore, the primary aim of driver signing is to make it tamper-proof, prevent unauthorized alterations, and execute a smooth installation.
Prerequisite Before Signing a Kernel Driver
Before you sign any Windows Kernel Driver, you need an EV Code Signing Certificate and an account on Microsoft Partner Center. In addition, you will require to convert your driver file to .CAB extension. Otherwise, it would become complex or nearly impossible for end-users to release a driver.
#1: Obtain an EV Code Signing Certificate
An Extended Validated Code Signing Certificate is the first requirement to sign a kernel driver. CA only issues it to organizations with a physical address, which has been active for the past three years.
Microsoft prefers EV Code Signing Certificates from reliable CAs only.
Furthermore, an EV certificate will also help you to build a business reputation across all digital platforms. And it will leverage you to make the driver valid for a lifetime through its timestamping functionality.
Moreover, you will receive the private key in a hardware security module, aiding in maintaining source-code integrity and confidentiality.
#2: Creating a Microsoft Partner Center Account
Microsoft Partner Center is a platform where you must upload the EV-signed kernel driver file. After uploading, Microsoft will review and sign it with their Code Signing Certificate.
As a result, your kernel driver will align with specific system requirements, permitting its installation on the Windows operating system.
In addition, before you create an account on MS Partner Center, you must have an Azure Active Directory account. Otherwise, it will become a highly complex task to release the driver.
Further, you must follow the below steps to generate an account and configure on the Partner Center portal to sign driver:
Step 1: Go to the Microsoft Partner Center portal and click “Become a partner. If you already have an account on the platform, Sign In to it. (Note: Use the same ID for the Azure AD account).
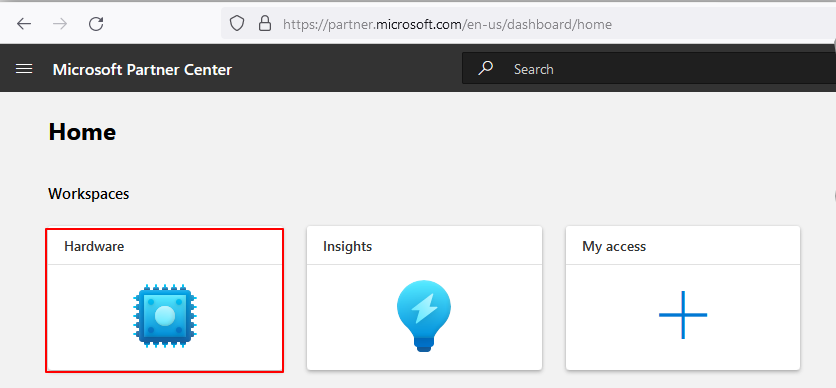
Step 2: Once you sign in, you will see two options – Insights and My Access.
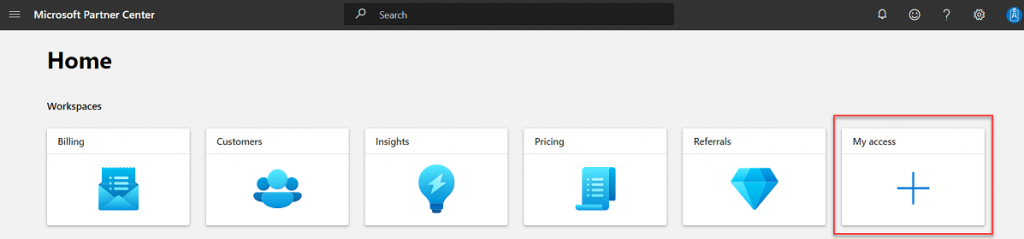
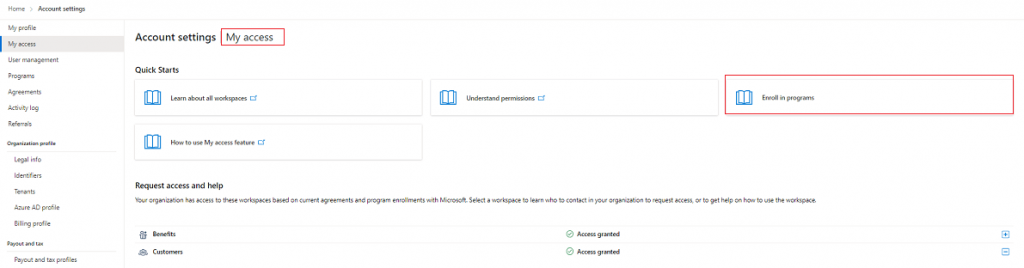
Step 3: Click on My Access. Further, a new interface will open, displaying the Quick Start options.
Step 4: From the given alternatives, select the Enroll in programs.
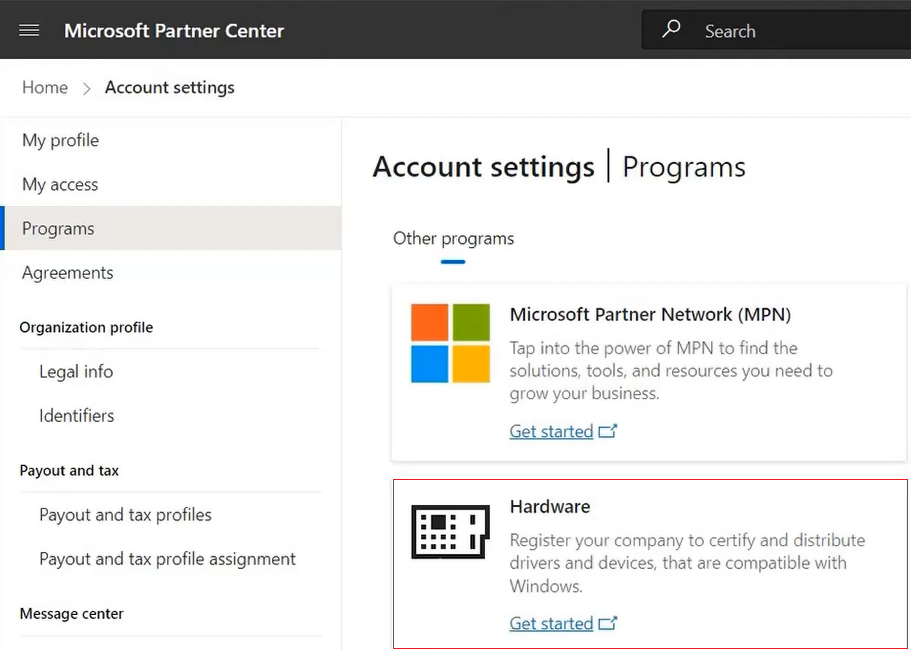
Step 5: Now, you will get navigated to Programs, under which you must select Hardware.
Step 6: The portal will display EV Code Signing Certificate requirements after selecting the hardware option. Click on the Next button and move further.
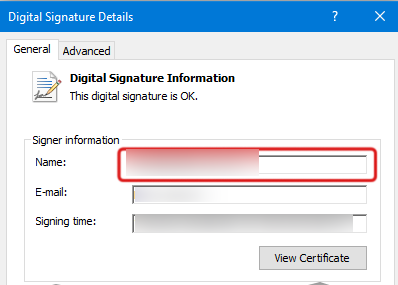
Step 7: The platform will display a form with the title “Digital Signature Details.” Make sure to fill out all the information you mentioned in your EV Code Signing Certificate.
Step 8: A random page with EV certificate information will get displayed, click on Next and move further.
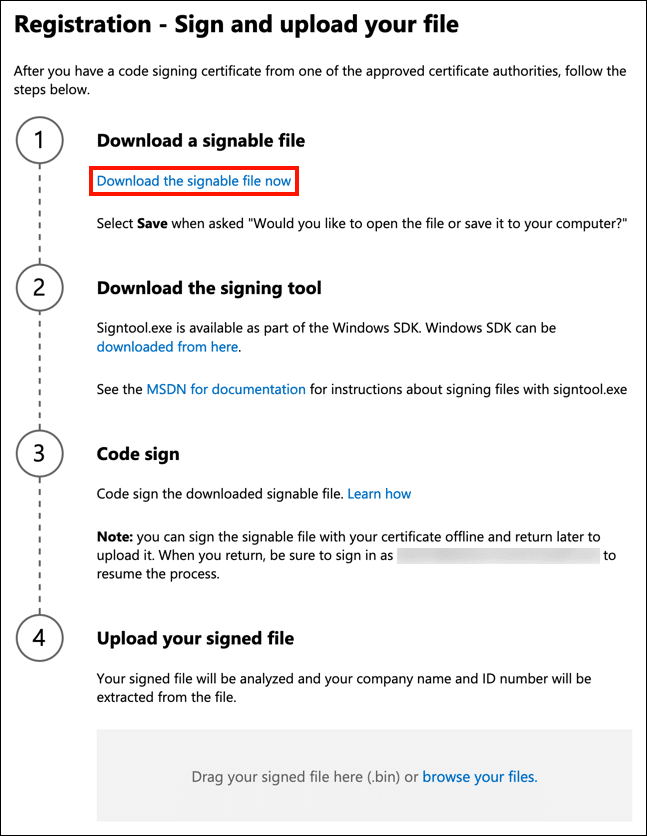
Step 9: Further, you need to complete a four-step registration process on the portal, including:
- Download a binary file
- Download the signing tool
- Sign the downloaded file using your EV Code Signing Certificate
- Upload the signed file on the portal
Step 10: After receiving the file, the portal will validate it. You will see the Hardware option with Insights and My Access on your dashboard if you complete the process.
#3: Creating a .CAB Package
To sign and upload the driver, you must create a .CAB package, consisting of .INF and .DDF file. When you save your driver code file in the release configuration, ensure you have a binary and debugging symbol file of the kernel drive.
And ensure that self-signed certificate information is no longer embedded within files, as you need to sign them using the Extended Validation Code Signing Certificate.
Further, you must create a .inf file. The hardware-based driver prefers such files. However, Microsoft makes Windows Kernel Driver mandatory.
Under the .inf file, you must define the following things:
- Classification of the Windows Kernel Driver
- GUID (Globally Unique Identifier)
- Driver’s Catalog
- Path to Destination Directory
- Binary of driver (32-bit and 64-bit)
- Installation instructions
- Driver’s functionality description
- Driver’s arbitrary name
- Name of the driver developing company
- Digital signing date and version of the driver
Once you include all the information using relevant variables, save it as a text file with .inf as its extension. Further, create a single directory of the driver and put all files under it. And it will be called a.CAB package.
Additionally, create a .ddf file like the one below, but rename the highlighted keywords with your driver directory and .inf file name.
.OPTION EXPLICIT     ; Generate errors
.Set CabinetFileCountThreshold=0
.Set FolderFileCountThreshold=0
.Set FolderSizeThreshold=0
.Set MaxCabinetSize=0
.Set MaxDiskFileCount=0
.Set MaxDiskSize=0
.Set CompressionType=MSZIP
.Set Cabinet=on
.Set Compress=on
.Set DestinationDir=InjectAll
InjectAll\InjectAll.inf
.Set DestinationDir=InjectAll\x64
InjectAll\x64\Drv64.sys
InjectAll\x64\Drv64.pdb
.Set DestinationDir=InjectAll\x86
InjectAll\x86\Drv32.sys
InjectAll\x86\Drv32.pdb
Now you have all the files required to create a .CAB package. But before moving to the signing process, verifying the file content is essential. For the verification purpose, utilize a built-in tool – InfVerif, and run the below command in the command prompt:
path-to\InfVerif.exe /v path-to\FileName.infAfter the .inf file validation, it’s time to create .CAB package, for which we will use the MakeCab tool from Microsoft.
Execute the following steps to generate the package:
Step 1: Open Command Prompt
Step 2: Use the cd command to navigate to the location where the driver directory is present on the machine
Step 3: Run the following command:
makecab /d CabinetName1=YourFileName.cab /D DiskDirectory=. /f YourFileName.ddfAfter that, the system will return your .CAB driver package as an output at the same location or within the same directory where the .ddf file is present.
The Windows Kernel Drivers Signing Procedure
After completing all the requirements and generating the .CAB package, it’s time to code-sign it and release it for end-users. The entire Windows kernel driver signing process is in two parts.
The first part deals with signing using your EV Code Signing Certificate. The second part deals with signing by Microsoft to make it align with security and system requisites.
Part 1: Sign with your EV Code Signing Certificate
To sign with an EV Code Signing Certificate, the SignTool utility will get used. You must complete the below steps to complete signing:
Step 1: Plug the hardware security module, containing the private key to the system.
Step 2: Open the command prompt and run the following command:
makecab /d CabinetName1=YourFileName.cab /D DiskDirectory=. /f YourFileName.ddfIn the command, you have to define the following keywords:
| Keyword | Replace With |
| Link to CA’s timestamp server | Provide a direct link to the timestamp server of the CA, which has issued the EV Code Signing Certificate |
| YourFileName.cab | Replace with the name of your .CAB package file name |
| <thumbprint> | It’s the hash value of your Code Signing Certificate |
After running the command, the system will return you a signed and timestamped .CAB package. Now, it’s time to get it signed by Microsoft.
Part 2: Upload Signed Driver File To Microsoft Hardware Portal
In this part, the final signing will be completed by Microsoft. Just a few steps to complete, and you will be ready to release your Windows kernel driver.
Step 1: Log In to your Microsoft Partner Center portal account.
Step 2: Click on the Hardware button, available on the dashboard.
Step 3: Select the Submit new hardware option.
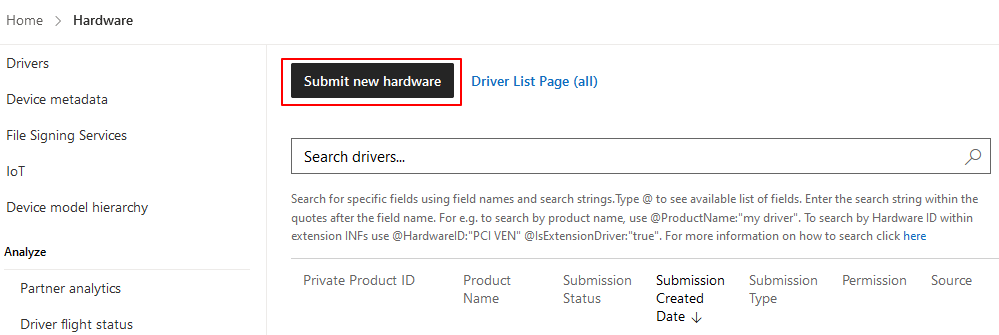
Step 4: Input mentioned details and upload the signed .CAB package file.
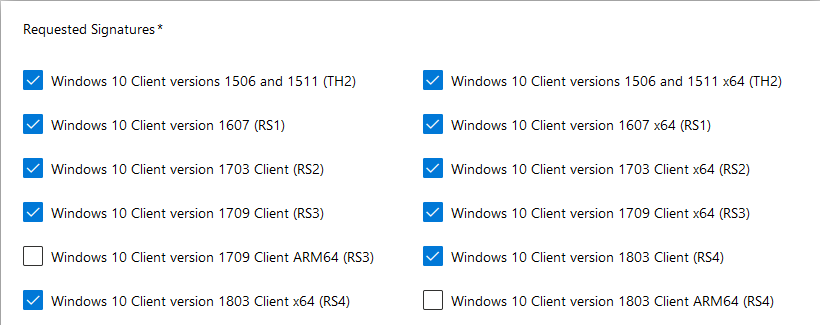
Step 5: Select the Windows Operating System versions with which your driver is entirely compatible.
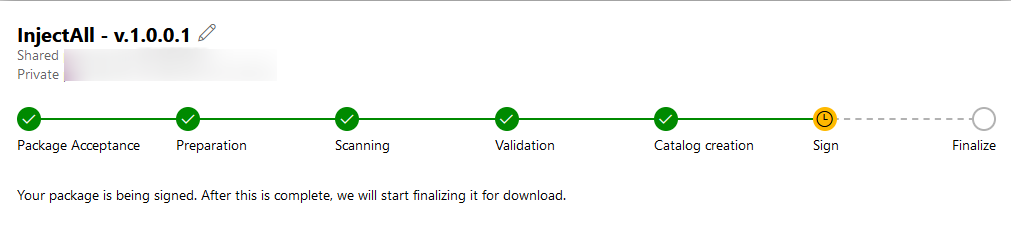
Step 6: Wait for the process to complete by analyzing the progress bar.
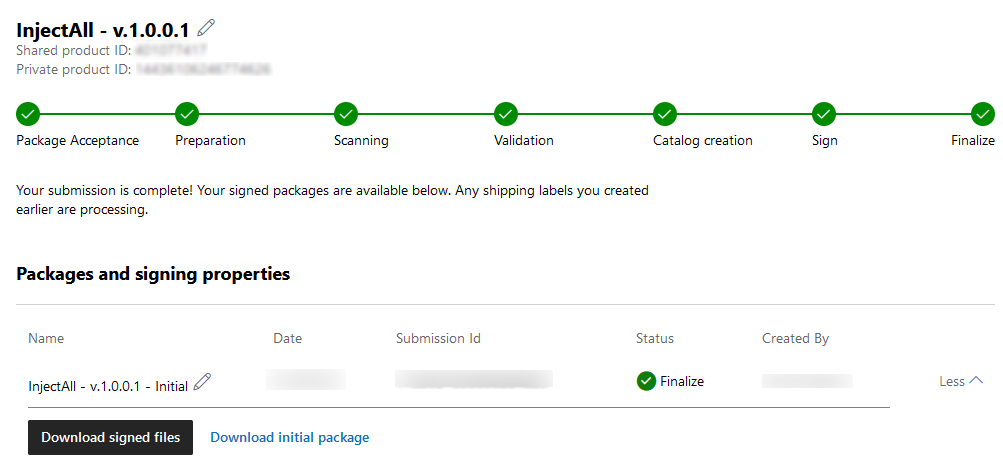
Step 7: When Microsoft completes its process, you will see a download button. Click on download signed files and store the file on your machine.
Step 8: Open the file properties to see that Microsoft has signed the driver.
Now all your users can effortlessly install the driver on compatible Windows OS without encountering warnings.
Where To Buy Windows Driver Compatible EV Code Signing Certificate?
Finding an EV Code Signing Certificate is easy on the internet. But, discovering a reliable provider is an effort-consuming task.
However, you can eliminate such efforts and save cost and time, as SignMyCode offers the Cheapest EV Code Signing Certificate for Windows. It will aid you in signing kernel drivers and all other Windows-compatible executable files.
In addition, SignMyCode assures to offer:
- Certificate from only trustworthy CAs, such as Comodo, Sectigo, DigiCert, and Certera
- 24/7/375 support from professionals
- Free guides and manuals to streamline certificate lifecycle
- Assistance in generating documents to pass the EV validation process
- All Code Signing Certificates at the cheapest price ever
Concluding Up
Windows Kernel Driver is a crucial executable file, as it directly communicates with the operating system’s core. To ensure that only legitimate drivers are getting developed and released, Microsoft self-checks verifies, and signs drivers before permitting the publisher to release them.

Cheap Code Signing Certificates
Prevent Code Tampering and Authenticate Code Integrity by Digitally Sign your Code with Trusted Code Signing Certificates.
Starting at Just $215.99/Year
