Step-By-Step Guide To Install Sectigo Code Signing Certificate on Windows
Important Note: This is Outdated Process, Applicable for the orders, who purchased before May 14, 2023! Based on New CA/B requirement, all OV, EV and Individual Code Signing Certs now generated and stored on Hardware tokens or HSM only.
Recommended: Follow the Steps to Install Individual or OV Code Signing Certificates
——————————————————————————————-
Before you start using the Sectigo Code Signing Certificate to make software tamper-proof, you need it to install on the computer system. Without installation, the system will get disabled from fetching its details and making it available for usage.
The procedure to install Code Signing Certificate requires only 15-20 minutes. And by following the below steps, you can even complete installation in less time.
Moreover, every software developer/publisher understands the procedure, as signing is necessary before releasing any software. So, let’s get started.
An Overview Of Code Signing on Windows: What, Why, and How
Code Signing executable files, including desktop, web-based and mobile applications is necessary and a crucial security approach. It helps to prevent attackers from reading and modifying the source code.
Most security experts consider the Windows operating system to perform signing procedures, due to its friendly interface and high usage by Windows Code Signing Certificate. But for Apple device-compatible apps, you need to use a macOS only.
Windows OS has a built-in certificate management application, providing the feature to maintain a certificate of the current user and local machine. As every executable file and digital platform has its requirements, it helps to fulfill them seamlessly.
Moreover, you must code sign every software, as it verifies you as an authorized publisher. And whenever end-users will install the app, they will not see a warning message from the Windows OS. It will build their confidence in the brand and they will prefer your software in the future too.
The Reasons To Choose Sectigo Code Signing Certificate
Sectigo is a prominent Certificate Authority, issuing avant-garde Code Signing Certificates for two decades. It’s also the parent organization of Comodo, another leading Certificate Authority. Sectigo follows all the CA/B forum guidelines and updates all its solutions accordingly.
When you purchase a Sectigo Code Signing Certificate, you don’t have to worry about compatibility and security issues. Its solutions use advanced hashing and encryption algorithms to make software cracking near to impossible.
Moreover, any software developer and publisher can avail Sectigo certificate, as it’s available in all three validation levels, including:
- Individual Validated Code Signing Certificate
- Organization Validated Code Signing Certificate
- Extended Validated Code Signing Certificate
Furthermore, Sectigo’s validation procedure is way smoother as compared to other CAs. And once you get Sectigo verified, all operating systems and digital platforms treat you as a legitimate publisher. And you get the leverage of:
- Timestamping, retaining software validity and integrity after certificate expiration.
- Complete compatibility with Microsoft Windows.
- Assurance of securing any executable file, including .exe, Java applets, Adobe Air, Microsoft Office Macro, .dll, .cab, Microsoft VBA, MS Authenticode, PowerShell, and more.
- Unbounded signing, until the certificate, is valid.
- 100% guarantee of eliminating Unknown Publisher Warning and passing SmartScreen filter. (SmartScreen filter passes only with Sectigo EV Code Signing Certificate)
Installation Procedure To Follow
To install the Sectigo Code Signing Certificate on your Windows-based computer system, follow all the below steps:
Step 1: Access Certificate Management utility
Open the startup menu and search for “Manage user certificates”. Once you click on the application, it will open the certificate management interface.

Step 2: Open the Certificate Import Wizard
In the left panel, all the certificate category folders will be available. Right-click on Personal to open the menu. Then All Tasks >> Import.

Step 3: Access and Utilize Import Wizard
After clicking on Import, Certificate Import Wizard will open. Click on the Next button.

Step 4: Select Sectigo Code Signing Certificate
Use the Browse button to select the Sectigo Code Signing Certificate. After the successful selection, the file name field will display the path to the file. After that, click on the Next button.

Step 5: Input the Password
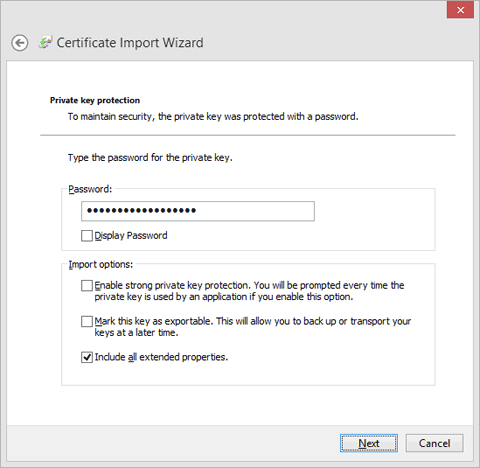
Further, fill in the password associated with your Code Signing Certificate and select the checkbox to mark the selected key as exportable and to include extended properties. And click on the Next button.
Step 6: Select the Installation Location
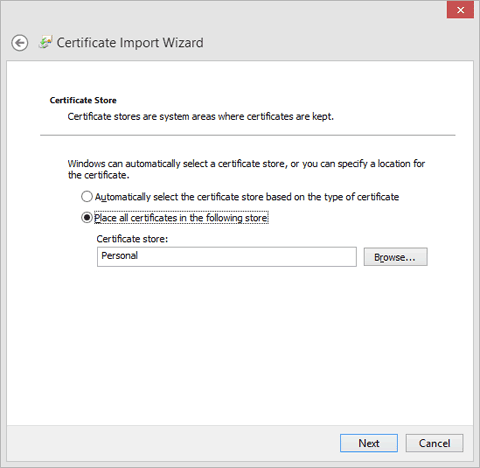
Select the folder, where you want to import the Sectigo Certificate. Utilize the browse option to choose the Personal folder, if it doesn’t get selected by default. And also choose the “Place all certificates in the following store” option. Then, click on the Next button.
Step 7: Verify and Install
Verify the details and Finish the process to execute the Sectigo certificate installation.
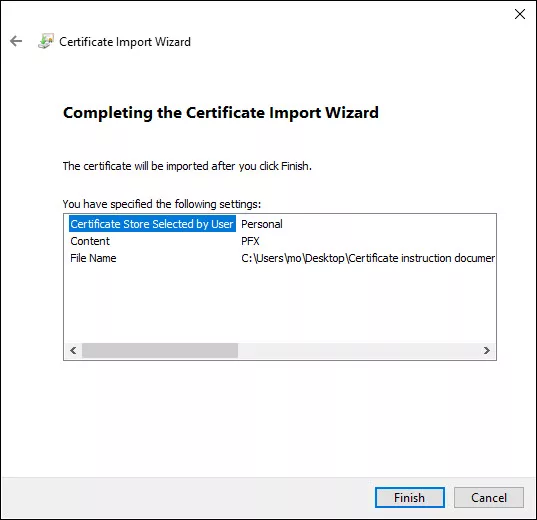
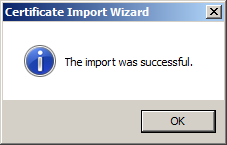
After the successful installation of the Sectigo Code Signing Certificate, you will see a similar dialogue box as below.
Concluding Up
Installing a Sectigo Code Signing Certificate is an effortless task on a Windows machine. You only need to access the built-in certificate management application and it will provide you with a clean interface. From there, select the folder in which you want to install the certificate.
Further, open the Certificate import wizard, select the file, fill password, and verify the details. And your certificate will get installed with utmost accuracy.
Within 10-15 minutes, the Windows machine will prepare you for tamper-proofing any executable file using the Sectigo Code Signing Certificate.
